Keyestudio Basic Starter Kit for BBC Micro:bit

Download code ,CoolTerm software ,Driver and more details, please refer to the following link: https://fs.keyestudio.com/KS4003-4004
1. Description
Micro:bit, half the size of a credit card, is a micro controller with ARM structure designed by BBC. It is mainly applied to programming education of teenagers, coming with an on-board Bluetooth, an accelerator, 3 buttons, an electronic compass and a 5 x 5 LED dot matrix.
To make starters grasp how to program by micro:bit boards, we launch this kit for them. Moreover, this kit consists of the commonly used resistors, LEDs, digital tubes, sensors and modules. A numerous of experimental courses are provided to guide you as well. We believe that you will enjoy playing with this micro:bit kit.
2. Kit List
When you get the Keyestudio Micro:bit starter learning kit, please check whether the components listed below are all included.
No |
Name |
QTY |
Picture |
|---|---|---|---|
0 |
Keyestudio Micro:bit main board V2.0 |
NOT included in KS4003 |
|
1 |
Keyestudio Micro:bit T Type Shield |
1 |
|
2 |
Red LED |
10 |
|
3 |
Yellow LED |
10 |
|
4 |
Green LED |
10 |
|
5 |
RGB |
1 |
|
6 |
Adjustable Potentiometer |
1 |
|
7 |
Photoresistor |
3 |
|
8 |
Flame Sensor |
1 |
|
9 |
LM35DZ Temperature Sensor |
1 |
|
10 |
S8050 Triode |
1 |
|
11 |
Tilt Switch |
2 |
|
12 |
220Ω Resistor |
10 |
|
13 |
1KΩ Resistor |
10 |
|
14 |
10KΩ Resistor |
10 |
|
15 |
2.4KΩ Resistor |
8 |
|
16 |
51Ω Resistor |
5 |
|
17 |
Active Buzzer |
1 |
|
18 |
Passive Buzzer |
1 |
|
19 |
Button Cap |
4 |
|
20 |
Micro USB Cable |
1 |
|
21 |
1-Digit Tube Module |
1 |
|
22 |
4-Digit Tube Module |
1 |
|
23 |
8*8 Dot Matrix |
1 |
|
24 |
74HC595N Chip |
1 |
|
25 |
L293D Motor Driver Chip |
1 |
|
26 |
Keyestudio Water Level Sensor |
1 |
|
27 |
Keyestudio Soil Humidity Sensor |
1 |
|
28 |
Keyestudio PIR Motion Sensor |
1 |
|
29 |
HC-SR04 Ultrasonic Sensor |
1 |
|
30 |
Keyestudio Micro Servo |
1 |
|
31 |
Keyestudio 1-Channel Relay Module |
1 |
|
32 |
Keyestudio Sound Sensor |
1 |
|
33 |
Keyestudio 1602 LCD Module |
1 |
|
34 |
Keyestudio Specialized Power Module |
1 |
|
35 |
DC Motor |
1 |
|
36 |
6 AA Battery Holder |
1 |
|
37 |
Breadboard |
1 |
|
38 |
Breadboard Wire |
30 |
|
39 |
40pins M-F DuPont Line |
1 |
|
40 |
Resistor Color Chart |
1 |
|
41 |
Fan |
1 |
|
42 |
2 AA Battery Holder |
1 |
|
43 |
1.5V AA Battery(not included) |
8 |
|


3. Introduction
(1) What is Micro:bit?
Designed by BBC, Micro:bit main board aims to help children aged above 10 years old to have a better learning of programming.
It is equipped with loads of components,including a 5*5 LED dot matrix, 2 programmable buttons, a compass, a Micro USB interface and a Bluetooth module and others. Though it is just the size of a credit card, it boasts multiple functions. To name just a few, it can be applied in programming video games, making interactions between light and sound, controlling a robot, conducting scientific experiments, developing wearable devices and make some cool inventions like robots and musical instruments, basically everything imaginable.
This new version, that’s version 2.0, of Micro:bit main board has a touch-sensitive logo and a MEMS microphone. And there is a buzzer built in the other side of the board which makes playing all kinds of sound possible without any external equipment. The golden fingers and gears added provide a better fixing of crocodile clips. Moreover, this board has a sleeping mode to lower the power consumption of battery and it can be entered if users long press the Reset & Power button on the back of it. More importantly, the CPU capacity of this version is much better than that of the V1.5 and the V2 has more RMA.
In final analysis, the V2 Micro:bit main board can allow customers to explore more functions so as to make more innovative products.
(2) Comparison between V2.0 & V1.5
Micro:bit main board V2.0:

Micro:bit main board V1.5:

More details:

By pressing the Reset & Power button, you can reset the Micro: Bit and restart the program. If holding it down and release it, the sleep mode will be activated. That can save the battery capacity.
For more information,please resort to following links:
https://tech.microbit.org/hardware/
https://microbit.org/new-microbit/
https://www.microbit.org/get-started/user-guide/overview/
https://microbit.org/get-started/user-guide/features-in-depth/
(3) Pin out
Micro:bit main board V2.0 VS V1.5


Browse the official website for more details:
https://tech.microbit.org/hardware/edgeconnector/
https://microbit.org/guide/hardware/pins/
(4) Notes for the application of Micro:bit main board V2.0
It is recommended to cover it with a silicone protector to prevent short circuit for it has a lot of sophisticated electronic components.
Its IO port is very weak in driving since it can merely handle current less than 300mA. Therefore, do not connect it with devices operating in large current,such as servo MG995 and DC motor or it will get burnt. Furthermore, you must figure out the current requirements of the devices before you use them and it is generally recommended to use the board together with a Micro:bit shield.
It is recommended to power the main board via the USB interface or via the battery of 3V. The IO port of this board is 3V, so it does not support sensors of 5V. If you need to connect sensors of 5 V, a Micro: Bit expansion board is required.
When using pins(P3、P4、P6、P7、P10)shared with the LED dot matrix, blocking them from the matrix or the LEDs may display randomly and the data about sensors maybe wrong.
The battery port of 3V cannot be connected with battery more than 3.3V or the main board will be damaged.
Forbid to use it on metal products to avoid short circuit.
To put it simple, Micro:bit V2 main board is like a micro computer which has made programming at our fingertips and enhanced digital innovation. And about programming environment, BBC provides a website: https://microbit.org/code/ ,which has a graphical MakeCode program easy for use.
4. Install Micro:bit Driver
If you have downloaded micro:bit driver, then no need to download it again.
If it is you first time to use micro:bit main board, then you will have to download the driver.
First of all, connect the micro:bit to your computer using a USB cable.
And enter website https://fs.keyestudio.com/KS4003-4004 to download the driver file of micro:bit  .
.
5. Instructions
The following instructions are applied for Windows system but can also serve as a reference if you are using a different system.
5.1 Write code and program
This chapter describes how to write program with the App Micro: Bit and load the program to the Micro: Bit main board V2.
You are recommended to browse the official website of Micro:bit for more details, and the link is attached below:
https://microbit.org/guide/quick/
Step 1: connect the Micro: Bit main board V2 with your computer
Firstly, link the Micro: Bit main board V2 with your computer via the USB cable. Macs, PCs, Chromebooks and Linux (including Raspberry Pi)systems are all compatible with the Micro: Bit main board V2.
Note that if you are about to pair the board with your phone or tablet, please refer to this link:
https://microbit.org/get-started/user-guide/mobile/


Secondly, if the red LED on the back of the board is on, that means the board is powered. Then Micro: Bit main board V2 will appear on your computer as a driver named ‘MICROBIT(E:)’. Please note that it is not an ordinary USB disk as shown below.

Step 2: writing programs
View the link: https://makecode.microbit.org/ in your browser;
Click ‘New Project’;
The dialog box ‘Create a Project’ appears, fill it with ‘heartbeat’ and click ‘Create √’to edit.
If you are running Windows 10 system, it is also viable to edit on the APP MakeCode for micro:bit , which is exactly like editing in the website. And the link to the APP is https://www.microsoft.com/zh-cn/p/makecode-for-micro-bit/9pjc7sv48lcx?ocid=badgep&rtc=1&activetab=pivot:overviewtab


Write a set of micro:bit code. You can drag some modules in the Blocks to the editing area and then run your program in Simulator of MakeCode editor as shown in the picture below which demonstrates how to edit ‘heartbeat’ program .

Step 3: download test code
If your computer is Windows 10 and you have downloaded the APP MakeCode for micro:bit to write program, what you will have to do to download the program to your Micro: Bit main board V2 is merely clicking the ‘Download’ button, then all is done.
If you are writing programs through the website, following these steps:
Click the ‘Download’ in the editor to download a “hex” file, which is a compact program format that the Micro: Bit main board can read. Once the hexadecimal file is downloaded, copy it to your board V2 just like the process that you copy the file to the USB driver. If you are running Windows system, you can also right-click and select ‘Send to → MICROBIT(E)‘ to copy the hex file to the Micro: Bit main board V2.

You can also directly drag the “hex” file onto the MICROBIT (E) disk.


During the process of copying the downloaded hex file to the Micro: Bit main board V2, the yellow signal light on the back side of the board flashes. When the copy is completed, the yellow signal light will stop flashing and remain on.
Step 4: run the program
After the program is uploaded to the Micro: Bit main board V2, you could still power it via the USB cable or change to via an external power. The 5 x 5 LED dot matrix on the board displays the heartbeat pattern.


Step 5: other programming languages
This chapter has described how to use the Micro: Bit main board V2.
But except for the Makecode graphical programming introduced you can also write Micro: Bit programs in other languages. Go to the link: https://microbit.org/code/ to know about other programming languages, or view the link: https://microbit.org/projects/, to find something you want to have a go.
5.2 Makecode
Browse https://makecode.microbit.org/ and enter Makecode online editor or open the APP MakeCode for micro:bit of Windows 10.

Click “New Project”, and input “heartbeat”, then enter Makecode editor, as shown below:

There are blocks “on start” and “forever” in the code editing area.
When the power is plugged or reset,“on start”means that the code in the block only executes once, while“forever”implies that the code runs cyclically.
5.3. Quick Download
As mentioned before, if your computer is Windows 10 and you have downloaded the APP MakeCode for micro:bit to write programs, the program written can be quickly downloaded to the Micro: Bit main board V2 by selecting ‘Download’.
While it is a little more trickier if you are using a browser to enter makecode. However, if you use Google Chrome, suitable for Linux,macOS and Windows 10, the process can be quicker too.
We use the webUSB function of Chrome to allow the internet page to access the hardware device connected USB.
You could refer to the following steps to connect and pair devices.
Device pairing
Connect micro:bit to your computer by USB cable. Click “…” beside “Download” and click “Pair device”.

Then click another “Pair device” as shown below.

Then select ‘’BBC micro:bit CMSIS-DPA” and click “Connect”. If ‘’BBC micro:bit CMSIS-DPA” does not show up for selection, please refer to https://makecode.microbit.org/device/usb/webusb/troubleshoot
We also provide  in the resource link.
What’s more, if you don’t know how to update the firmware of micro:bit, refer to the link: https://microbit.org/guide/firmware/ or browse folder we provide.

Then click ”Download”. The program is directly downloaded to Micro: Bit main board V2 and the sentence “Download completed!” appears.

5.4 Resources and test code
Tools ,test code and other resources can be downloaded via the link: https://fs.keyestudio.com/KS4003-4004
Click the link, you will see the file clip

And the V2 file folder contains following files:

5.5 Input test code
We provide hexadecimal code files (project files) for each project. The file contains all the contents of the project and can be imported directly, or you can manually drag the code blocks to complete the program for each project. For simple projects, dragging a block of code to complete the program is recommended. For complex projects, it is recommended to conduct the program by importing the hexadecimal code file we provide.
Let’s take the “Heatbeat” project as an example to show how to load the code.
Open the Web version of Makecode or the Windows 10 App version of Makecode.

Click “Import File”;


Select “../Makecode Code/Project 1_ Heart beat/Project 1_ Heart beat.hex” ;
Then click “Go ahead”.


In addition to importing the test code file provided into the Makecode compiler above, you can also drag the the test code file provided into the code editing area of the Makecode compiler, as shown in the figure below:

After a few seconds, it is done.

Note: if your computer system is Windows7 or 8 instead of Windows 10, the pairing cannot be done via Google Chrome. Therefore, digital signal or analog signal of sensors and modules cannot be shown on the serial port simulator. However, you need to read the corresponding digital signal or analog signal.
So what can we do? You can use the CoolTerm software to read the serial port data of the micro:bit. Next chapter is about how to install CoolTerm.
5.6 CoolTerm Installation
CoolTerm program is used to read the data on serial port.
Download CoolTerm program:
https://freeware.the-meiers.org/
After the download, we need to install CoolTerm program file, below is Window system taken as an example.
Choose“win”to download the zip file of CoolTerm
Unzip file and open it. (also suitable for Mac and Linux system)


Double-click  .
.

The functions of each button on the Toolbar are listed below:

|
Opens up a new Terminal |
|---|---|
|
Opens a saved Connection |
|
Saves the current Connection to disk |
|
Opens the Serial Connection |
|
Closes the Serial Connection |
|
Clears the Received Data |
|
Opens the Connection Options Dialog |
|
Displays the Terminal Data in Hexadecimal Format |
|
Displays the Help Window |


6. Projects
Project 1: Heartbeat

(1) Project Description:
This project is easy to conduct with a micro:bit V2 main board, a Micro USB cable and a computer. The micro:bit LED dot matrix will display a relatively big heart-shaped pattern and then a smaller one. This alternative change of this pattern is like heart beating. This experiment serves as a starter for your entry to the programming world.
(2) Components Needed:
Micro:bit main board V2 *1
Micro USB cable*1
(3) Test Code:
Attach the Micro:bit main board V2 to your computer via the Micro USB cable and begin editing.
Firstly, click ”basic” module and find and drag the block“show icon  “ to module “forever”;

Secondly, click ”basic” module again and find and drag the block “show icon ” to module “forever”and click the little triangle to select “show icon  ”;
”;

Complete Program:

Note: The “on start” means that the code in the block only executes once, while “forever” implies that the code runs cyclically.
Click “JS JavaScript”, you will find the corresponding programming languages.

Click the little triangle of JavaScript to choose “Python”, you will find the corresponding Python programming languages.

(4) Test Results:
After uploading test code to micro:bit main board V2 and keeping the connection with the computer to power the main board, the LED dot matrix shows pattern “ ”and then “
 ”alternatively.
(Please refer to chapter 5.3 to know how to download test code quickly.)
If the downloading is not smooth, please remove the micro USB from the main board and then reconnect them and reopen Makecode to try again.
Project 2: Light A Single LED
(1) Project Description:
In this project, we intend to control a certain LED of the micro:bit main board V2 to shine.
(2) Components Needed:
Micro:bit main board V2 *1
Micro USB cable*1
(3) Test Code:
Attach the Micro:bit main board V2 to your computer via the Micro USB cable and begin editing.
Firstly, click ”Led” module and then the ”more” module to find and drag the block “led enable false“ to block “on start” ; click the little triangle of “led enable false“ to select ”true”;

Secondly, click ”Led” module and to find and drag the block “toggle x 0 y 0“ to block “forever” and alter “x0” to ”x1”;

Thirdly, click “Basic” module to find and drag the block ”pause(ms)100” to “forever” block and set pause to 500;

Fourthly, copy the block  and place it into “forever” block;

Fifthly, click “Led” module to find and drag the block ”plot x 0 y 0” to “forever”block and change the “x 0 y 0” to “x 3 y 4”;

Sixthly, copy the block “pause(ms)500” and place it into “forever” block;

Lastly, click ”Led” module to find and drag the block ”unplot x 0 y 0” to “forever” block and change “x 0 y 0” to “x 3 y 4”; and copy and place the block “pause(ms)500” to block “forever”;
Complete Program:

Click “JS JavaScript”, you will find the corresponding programming languages.

Click the little triangle of ”JS JavaScript” to choose “Python”, you will find the corresponding Python programming languages.

(4) Test Results:
After uploading test code to micro:bit main board V2 and powering the main board via the USB cable, the LED in (1,0) lights up for 0.5s and the one in (3,4) shines for 0.5s and repeat this sequence.
Project 3: LED Dot Matrix
(1) Project Description:
Dot matrices are very commonplace in daily life. They have found wide applications in LED advertisement screens, elevator floor display, bus stop announcement and so on.
The LED dot matrix of Micro: Bit main board V2 contains 25 LEDs in a grid. Previously, we have succeeded in controlling a certain LED to light by integrating its position value into the test code. Supported by the same theory, we can turn on many LEDs at the same time to showcase patterns, digits and characters.
What’s more, we can also click”show icon“ to choose the pattern we like to display. Last but not the least, we can our design patterns buy ourselves.
(2) Components Needed:
Micro:bit main board V2 *1
Micro USB cable*1
(3) Test Code 1:
Link computer with micro:bit board by micro USB cable, and program in MakeCode editor.
A. Enter“Led”→“more”→“led enable false” B. Click the drop-down triangle button to select“true”.
Combine it with “on start” block
Click “Led” to move “plot x 0 y 0” into “forever”, then replicate “plot x 0 y 0” for 8 times, respectively set to“x 2”y 0”, “x 2”y 1”, “x 2”y 2”, “x 2”y 3”, “x 2”y 4”, “x 1”y 3”, “x 0”y 2”, “x 3”y 3”, “x 4”y 2”.

Complete Program:
|
“on start”: command block only runs once to start program. |
|---|
Select “JavaScript” and “Python” to switch into JavaScript and Python language code:


(4) Test Results 1:
Upload code 1 and power on , we will see the icon .

(5) Test Code 2:
Link computer with micro:bit board by micro USB cable, and program in MakeCode editor.
Enter “Basic” → “show number 0” block,
Duplicate it for 4 times, then separately set to “show number 1”, “show number 2”, “show number 3”, “show number 4”, “show number 5”.

Click “Basic” → “show leds”, then put it into “forever” block, tick blue boxes to light LED and generate “↓” pattern.

Move out the block “show string” from “Basic” block, and leave it beneath the “show leds” block.

Choose “show icon” from “Basic” block, and leave it beneath the block “show string “Hello!” block.

Enter “Basic” → “show arrow North”;
Leave it into “forever” block, replicate “show arrow North” for 3 times, respectively set to “North East”, “South East”, “South West”, “North West”.

Click “Basic” to get block “Clear screen” then remain it below the block “show arrow North West”

(5) Drag “pause (ms) 100” block from “Basic” block and set to 500ms, then leave it below “clear screen” block.

Complete Program:
|
“on start”: command block only runs once to start program. |
|---|

Select “JavaScript” or “Python” to switch into JavaScript and Python language code:


(6) Test Results 2:
Upload code 2 and plug micro:bit to power. Micro: bit starts showing number 1, 2, 3, 4, and 5, then cyclically display,“Hello!”,  ,
,  ,
,  ,
,  and
and  patterns.
Project 4: Programmable Buttons

(1) Project Description:
Buttons can be used to control circuits. In an integrated circuit with a button, the circuit is connected when pressing the button and it is open the other way around.
Micro: Bit main board V2 boasts three buttons, two are programmable buttons(marked with A and B), and the one on the other side is a reset button. By pressing the two programmable buttons can input three different signals. We can press button A or B alone or press them together and the LED dot matrix shows A,B and AB respectively. Let’s get started.
(2) Components Needed:
Micro:bit main board V2 *1
Micro USB cable*1
(3) Test Code 1:
Link computer with micro:bit board by micro USB cable, and program in MakeCode editor.
Delete“on start”and“forever”firstly,then click“Input”→“on button A pressed”
Click“Basic”→“show string”;
Then place it into“on button A pressed”block, change “Hello!”into“A”.
Copy code stringonce, tap the drop-down button “A” to select “B” and modify character “A” into “B”.
Copyonce, and set to “on button A+B pressed” and “show string “AB”.

Complete Code:
|
Press button A on Micro: bit main board |
|---|

Select “JavaScript” and “Python” to switch into JavaScript and Python language code:


(4) Test Results 1:
After uploading test code 1 to micro:bit main board V2 and powering the main board via the USB cable, the 5*5 LED dot matrix shows A if button A is pressed, B if button B pressed, and AB if button A and B pressed together.
(5) Test Code 2:
A. Click “Led” → “more” → “led enable false”,
B. Put it into the block “on start”,click drop-down triangle button to select “true” .
A. Tap “Variables” → “Make a Variable…” → “New variable name”
B. Enter “item” in the dialog box and click “OK”, then variable “item” is produced. And move “set item to 0” into “on start” block.

A. Click “Input” → “on button A pressed”.
B. Go to “Variables” → “ change item by 1 ”
C. Place it into“on button A pressed”and 1 is modified into 5.
Duplicatecode string once, click the drop-down button to select “B”, then set “change item by -5”.

A. Enter “Led” → “plot bar graph of 0 up to 0”
B. Keep it into “forever” block
C. Go to “Variables” to move “item” into 0 box, change 0 into 25.

A. Go to“Logic”to move out “if…true…then…”and “=”blocks,
B. Keep “=” into “true” box and set to “>”
C. Select “item” in the “Variables” and lay it down at left box of “>”, change 0 into 25;
D. Enter “Variables” to drag “set item to 0” block into “if…true..then…”, alter 0 into 25.

A. Replicate code string once
once
B. “>” is modified into “<” and 25 is changed into 0,
C. Leave it beneath code string.

Complete Program:
|
“on start”: command block runs once to start program. |
|---|

Select “JavaScript” and “Python” to switch into JavaScript and Python language code:


(6) Test Results 2:
Uploading test code 2 to micro:bit main board V2 and powering the main board via the USB cable, when pressing the button A the LEDs turning red increase, when pressing the button B the LEDs turning red reduce.
Project 5: Temperature Detection

(1) Project Description:
Actually, the Micro:bit main board V2 is not equipped with a temperature sensor, but uses the temperature sensor built into NFR52833 chip for temperature detection. Therefore, the detected temperature is more closer to the temperature of the chip, and there maybe deviation from the ambient temperature.
(2) Components Needed:
Micro:bit main board V2 *1
Micro USB cable*
(3) Test Code 1:
Click “Advanced” → ”Serial” → “serial redirect to USB” into “on start”

Go to “Serial” → “serial write value “x”=0” into “forever”

Click “Input” → “temperature(℃)” into “serial write value “x”=0 and change ”0” into “temperature”

Go to “Basic” → “pause (ms) 100” into “forever” and set pause to 500.

Complete Program:

Select “JavaScript” and “Python” to switch into JavaScript and Python language code:


(4) Test Results 1:
After uploading test code 1 to micro:bit main board V2, powering the main board via the USB cable, and clicking “Show console Device”, the data of temperature shows in the serial monitor page as shown below.


If you’re running Windows 7 or 8 instead of Windows 10, via Google Chrome won’t be able to match devices. You’ll need to use the CoolTerm serial monitor software to read data.
You could open CoolTerm software, click Options, select Serial Port, set COM port and baud rate to 115200 (after testing, the baud rate of USB Serial Port communication on Micro: Bit main board V2 is 115200), click OK, and Connect. The CoolTerm serial monitor shows the change of temperature in the current environment, as shown in the figures below :


(5) Test Code 2:
Link computer with micro:bit board by micro USB cable, and program in MakeCode editor,
A. Go to “Led” → “more” → “led enable false” block,
B. Keep it into the “on start” block, tap the triangle button to select “true”.
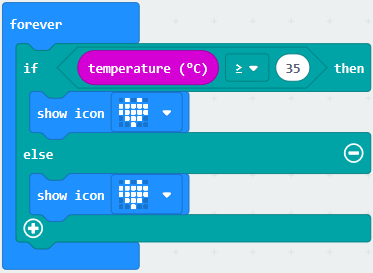
Tap “Logic” and drag “if…then…else” into “forever” block; and then drag “=” into “true”

Enter “Input” to move “temperature(℃)” into the left side of “=”; click the little triangle of “=” to choose “≥”, and change the “0” to “35”

Click “Basic” to find out block “show icon” and move it into “then”; copy and place the block “show icon” to “else” and click the little triangle of “ ” to select “
 ”.
”.
Complete Program:

Select “JavaScript” and “Python” to switch into JavaScript and Python language code:


(6) Test Results 2:
Uploading the code 2, when the ambient temperature is less than 35℃, 5*5 LED will show . When the temperature is equivalent to or greater than 35℃, the pattern
 will appear.
Project 6: Geomagnetic Sensor

(1) Project Description:
This project aims to explain the use of the Micro: bit geomagnetic sensor, which can not only detect the strength of the geomagnetic field, but also be used as a compass to find bearings. It is also an important part of the navigation attitude reference system (AHRS). Micro: Bit main board V2 uses LSM303AGR geomagnetic sensor, and the dynamic range of magnetic field is ±50 gauss. In the board, the magnetometer module is used in both magnetic detection and compass. In this experiment, the compass will be introduced first, and then the original data of the magnetometer will be checked.
The main component of a common compass is a magnetic needle, which can be rotated by the geomagnetic field and point toward the geomagnetic North Pole (which is near the geographic South Pole) to determine direction.
(2) Components Needed:
Micro:bit main board V2 *1
Micro USB cable*1
(3) Test Code 1:
Link computer with micro:bit board by micro USB cable, and program in MakeCode editor.
A. Click“Input”→“more”→“calibrate compass”
B. Lay down it into block“on start”.

A. Go to“Input”→“on button A pressed”.
B. Enter“Basic”→“show number”, put it into“on button A pressed”block;
C. Tap“Input”→“compass heading(℃)”, and place it into“show number”

Complete Program:
|
①“on start”: command block only runs once to start program. |
|---|

Select “JavaScript” and “Python” to switch into JavaScript and Python language code:


(4) Test Results 1:
After uploading test code to micro:bit main board V2 and powering the board via the USB cable, and pressing the button A, the board asks us to calibrate compass and the LED dot matrix shows “TILT TO FILL SCREEN”. Then enter the calibration page. Rotate the board until all 25 LEDs are on red as shown below.

After that, a smile pattern  appears, which implies the calibration is done. When the calibration process is completed, pressing the button A will make the magnetometer reading display directly on the screen. And the direction north, east, south and west correspond to 0°, 90°, 180° and 270°.
(5) Test Code 2:

This module can keep readings to determine direction, so does point to the current magnetic North Pole by arrow.

For the above picture, the arrow pointing to the upper right when the value ranges from 292.5 to 337.5. Since 0.5 can’t be input in the code the values we get are 293 and 338.
Link computer with micro:bit board by micro USB cable, and program in MakeCode editor,
Enter “Input” → “more” → “calibrate compass”
Move “calibrate compass” into “on start”
A. Click “Variables” → “Make a Variable…” → “New variable name:”
B. Input “x” in the blank box and click “OK”, and the variable “x” is generated.
C. Drag out “set x to” into “forever” block

A. Go to “Input” → “compass heading(℃)”, and keep it into “0” box

Tap “Logic” → “if…then…else”, leave it below block “sex x to compass heading”, then click icon for 6 times.
A. Place “and” into “true” block
B. Then move “=” block to the left box of “and”
C. Click “Variables” to drag “x” to the left “0” box, change 0 into 293 and set to “≥”;
D. Then copy “x≥293” once and leave it to the right “0” box and set to “x<338”

A. Go to “Basic” → “show leds”
B. Lay it down beneath  block,
then click “show leds” and the pattern
block,
then click “show leds” and the pattern  appears.

A. Duplicate for 6 times.
B. Separately leave them into the blank boxes behind “else if”.
C. Set to “x≥23 and x<68”, “x≥68 and x<113 ”, “x≥113 and x<158 ”, “x≥158 and x<203 ”, “x≥203 and x<248 ”, “x≥248 and x<293” respectively.
D. Then copy “show leds” for 7 times and keep them below the “else if…….then” block respectively.
E. Click the blue boxes to form the pattern“ ”, “
”, “ ”, “
”, “ ”, “
”, “ ”, “
”, “ ”, “
”, “ ”and “
 ”.
”.
Complete Program:
|
|---|


Select “JavaScript” and “Python” to switch into JavaScript and Python language code:


(6) Test Results 2:
Upload code 2 and plug micro:bit to power. After calibration, tilt micro:bit board, the LED dot matrix displays the direction signs.
Project 7: Accelerometer
(1) Project Description:
The Micro: Bit main board V2 has a built-in LSM303AGR gravity acceleration sensor, also known as accelerometer, with a resolution of 8/10/12 bits. The code section sets the range to 1g, 2g, 4g, and 8g.
We often use accelerometer to detect the status of machines.
In this project, we will introduce how to measure the position of the board with the accelerometer. And then have a look at the original three-axis data output by the accelerometer.
(2) Components Needed:
Micro:bit main board V2 *1
Micro USB cable*1
(3) Test Code 1:
Link computer with micro:bit board by micro USB cable, and program in MakeCode editor,
(1) A. Enter“Input”→“on shake”,
B. Click“Basic”→“show number”, place it into“on shake”block, then change 0 into 1.
(2) A. Copy code string for 7 times;
B. separately click the triangle button to select“logo up”,“logo down”,“screen up”,“screen down”,“tilt left”,“tilt right”and“free fall”, then respectively change 1 into 2, 3, 4, 5, 6, 7, 8.
Complete Program:
|
Shake the Micro:bit board |
|---|


Select “JavaScript” and “Python” to switch into JavaScript and Python language code:


(4) Test Results 1:
After uploading the test code 1 to micro:bit main board V2 and powering the board via the USB cable, if we shake the Micro: Bit main board V2. no matter at any direction, the LED dot matrix displays the digit “1”.
When it is kept upright (put its logo above the LED dot matrix), the number 2 will show.

When it is kept upside down( make its logo below the LED dot matrix) , it will show as below.

When it is placed still on the desk, showing its front side, the number 4 appears.

When it is placed still on the desk, showing its back side, the number 5 will exhibit.
When the board is tilted to the left , the LED dot matrix shows the number 6 as shown below.

When the board is tilted to the right , the LED dot matrix displays the number 7 as shown below

When the board is knocked to the floor, this process can be considered as a free fall and the LED dot matrix shows the number 8. (please note that this test is not recommended for it may damage the main board.)
Attention: if you’d like to try this function, you can also set the acceleration to 3g, 6g or 8g. But still ,we don not recommend.
(5) Test Code 2:
A. Go to“Advanced”→“Serial”→“serial redirect to USB”
B. Drag it into“on start”

A. Enter“Serial”→“serial write value x =0”
B. Leave it into“forever”block

A. Click“Input”→“acceleration(mg) x”;
B. Keep it into“0”box and capitalize the“x”

Go to “Basic” and move out “pause (ms) 100” below the block , then set to 100ms.

Replicate code string for 3 times and keep them into “forever” block,separately set the whole code string as follows:

Complete Program:
|
“on start”: command block runs once to start program. |
|---|

Select “JavaScript” and “Python” to switch into JavaScript and Python language code:


(6) Test Results 2:
Upload test code to micro:bit main board V2, power the main board via the USB cable, and click “Show console Device”.

After referring to the MMA8653FC data manual and the hardware schematic diagram of the Micro: Bit main board V2, the accelerometer coordinate of the Micro: Bit V2 motherboard are shown in the figure below:

The following interface shows the decomposition value of acceleration in X axis, Y axis and Z axis respectively, as well as acceleration synthesis (acceleration synthesis of gravity and other external forces).

If you’re running Windows 7 or 8 instead of Windows 10, via Google Chrome won’t be able to match devices. You’ll need to use the CoolTerm serial monitor software to read data.
You could open CoolTerm software, click Options, select Serial Port, set COM port and baud rate to 115200 (after testing, the baud rate of USB Serial Port communication on Micro: Bit main board V2 is 115200), click OK, and Connect. The CoolTerm serial monitor shows the data of X axis, Y axis and Z axis , as shown in the figures below :

Project 8: Light Detection
(1) Project Description:
In this project, we focus on the light detection function of the Micro: Bit main board V2. It is achieved by the LED dot matrix since the main board is not equipped with a photoresistor.
(2) Components Needed:
Micro:bit main board V2 *1
Micro USB cable*1
(3) Test Code:
Link computer with micro:bit board by micro USB cable, and program in MakeCode editor,
(1)A. Enter“Advanced”→“Serial”→“serial redirect to USB”;
B. Drag it into“on start”block.
(2) A. Go to“Serial”→“serial write value x =0”;
B. Move it into“forever”
(3) A. Click“Input”→“acceleration(mg) x”
B. Put“acceleration(mg) x”in the“0”box and change “x”into“Light intensity”.

(4) A. Click“Basic”→“pause (ms) 100”;
B. Lay it down into“forever”and set to 100ms.

Complete Program:
|
“on start”: command block runs once to start program. |
|---|

Select “JavaScript” and “Python” to switch into JavaScript and Python language code:


(4) Test Results:
Upload the test code to micro:bit main board V2, power the board via the USB cable and click “Show console Device”.

When the LED dot matrix is covered by hand, the light intensity showed is approximately 0; when the LED dot matrix is exposed to light,the light intensity displayed gets stronger with the light as shown below.

If you’re running Windows 7 or 8 instead of Windows 10, via Google Chrome won’t be able to match devices. You’ll need to use the CoolTerm serial monitor software to read data.
You could open CoolTerm software, click Options, select Serial Port, set COM port and baud rate to 115200 (after testing, the baud rate of USB Serial Port communication on Micro: Bit main board V2 is 115200), click OK, and Connect. The CoolTerm serial monitor shows the value of light intensity , as shown in the figures below :

Project 9: Speaker

(1) Project Description:
The Micro: Bit main board V2 has an built-in speaker, which makes adding sound to the programs easier. We can program the speaker to air all kinds of tones like playing the song Ode to Joy.
(2) Components Needed:
Micro:bit main board V2 *1
Micro USB cable*1
(3) Test Code:
Link computer with micro:bit board by micro USB cable, and program in MakeCode editor,
Enter “Basic” module to find “show icon”and drag it into “on start” block;
Click the little triangle to find “ ”
”

Enter “Music” module to find and drug “play sound giggle until done” into “forever” block;
Enter “Basic” module to find and drug “pause(ms) 100” into “forever” block ;
Change 100 into 1000;

Copy  three times and place it into “forever” block ;
Click the little triangle to select “happy”, ”hello”, ”yawn”;

Complete Program:

Select “JavaScript” and “Python” to switch into JavaScript and Python language code:


(4) Test Results:
Uploading the test code to micro:bit main board V2 and powering the board via the USB cable, the speaker utters sound and the LED dot matrix shows the logo of music.
Project 10: Touch-sensitive Logo

(1) Project Description:
The Micro: Bit main board V2 is equipped with a golden touch-sensitive logo, which can act as an input component and function like an extra button.
It contains a capacitive touch sensor that senses small changes in the electric field when pressed (or touched), just like your phone or tablet screen do.When you press it , you can activate the program.
(2) Components Needed:
Micro:bit main board V2 *1
Micro USB cable*1
(3) Test Code:
Link computer with micro:bit board by micro USB cable, and program in MakeCode editor,
Delete block “on start” and “forever”;
Enter “Input” module to find and drag “on logo pressed” ;
Click the little triangle to find “touched”’;

Enter module “Variables”→choose“Make a Variable”→input “start”→click “OK”
The variable “start” is established;
Enter “Variables” module to find and drag “set start to 0” into “on logo touched” block;

Enter “Input” module → click “more” → find and drag “running time(ms)” into the “0” of “set start to 0” block;

Enter “Basic” module to find and drag “show icon” into “on logo touched” block;

Enter “Input” module to find and drag “on logo pressed” → choose “released” → establish variable “time”;
Enter “Variables” module to find and drag “set time to 0” into “on logo pressed” block;
Enter “Math” module to find and drag “0-0” into the “0” of “set start to 0” block;

Enter “Input” module → “more” → find and drag “running time(ms) into “0” on the left side of “0-0”;
Enter “Variables” module to find and drag “start” into “0” on the right side of “0-0”;

Enter “Basic” module to find and drag “show number” into “on logo released” block;
Enter “Math” module to find and drag “square root 0” into “0”; Click the little triangle to find ”integer÷”;

Enter “Variables” module to find and drag “time” into “0” on the left side of “0-0” and change the “0” on the right side to ”1000”;

Complete Program:

Select “JavaScript” and “Python” to switch into JavaScript and Python language code:


(4) Test Results:
Uploading the test code to micro:bit main board V2 and powering the board via the USB cable, the LED dot matrix exhibits the heart pattern when the touch-sensitive logo is pressed or touched and displays digit when the logo is released.
Project 11: Microphone

(1) Project Description:
The Micro: Bit main board V2 is built with a microphone which can test the volume of ambient environment. When you clap, the microphone LED indicator will turn on. Since it can measure the intensity of sound, you can make a noise scale or disco lighting changing with music. The microphone is placed on the opposite side of the microphone LED indicator and in proximity with holes that lets sound pass. When the board detects sound, the LED indicator lights up.
(2) Components Needed:
Micro:bit main board V2 *1
Micro USB cable*1
(3) Test Code 1:
Link computer with micro:bit board by micro USB cable, and program in MakeCode editor,
Delete block “on start” and “forever”;
Enter “Input” module to find and drag “on loud sound”;
Enter “Basic” module to find and drag “show number” into “on loud sound” block ;

Copy  once;
once;
Click the little triangle of “lond” to choose ”quiet”;
Click the little triangle of “” to choose” ”;
”;

Complete Program:

Select “JavaScript” and “Python” to switch into JavaScript and Python language code:


(4) Test Results 1:
Uploading test code to micro:bit main board V2 and powering the board via the USB cable, the LED dot matrix displays pattern “”when you claps and pattern when it is quiet around.
(5) Test Code 2:
Link computer with micro:bit board by micro USB cable, and program in MakeCode editor,
Enter “Advanced” module→ choose “Serial” to find and drag “serial redirect to USB” into “on start” block ;
Enter “Variables” module → choose “Make a Variable” → input “maxSound” → click “OK”, variable ”maxSound” is established;
Enter “Variables” module to find and drag “set maxSound to 0” into “on start” block ;

Enter “Logic” module to find and drag “if true then…else” into “forever” block ;
Enter “Input” module to find and drag “button A is pressed” into “then” ;

Enter “Basic” module to find and drag “show number” into “then” ;
Enter “Variables” module to find and drag “maxSound” into “0” ;

Establish variable “soundLevel”;
Enter “Variables” module to find and drag“set soundLevel to 0”into “else”;
Enter “Input” module to find and drag “sound level” into “0”;

Enter “Led” module to find and drag “plot bar graph of 0 up to 0” into “else”;
Enter “Variables” module to find and drag “soundLevel” into the “0” behind “of”;
Change the “0” behind “up” to “255”;

Enter “Logic” module to find and drag “if true then” into “else” block ;
Enter “Logic” module to find and drag “0 > 0” into “then”;
Enter “Variables” module to find and drag “soundLevel” into “0” on the left side of “0-0” ;
Enter “Variables” module to find and drag “maxSound” into “0” on the right side;

Enter “Variables” module to find and drag “set maxSound to 0” into the second “then”;
Enter “Variables” module to find and drag “soundLevel” into the “0”;

Complete Program:

Select “JavaScript” and “Python” to switch into JavaScript and Python language code:


(6) Test Results 2:
Upload test code to micro:bit main board V2, power the board via the USB cable and click “Show console Device” as shown below.

When the sound is louder around, the sound value shows in the serial port is bigger as shown below.

What’s more, when pressing the button A, the LED dot matrix displays the value of the biggest volume (please note that the biggest volume can be reset via the Reset button on the other side of the board) while when clapping, the LED dot matrix shows the pattern of the sound.
Project 12: Bluetooth Wireless Communication

(1) Project Description:
The Micro: Bit main board V2 comes with a nRF52833 processor (with built-in Bluetooth 5.1 BLE(Bluetooth Low Energy) device) and a 2.4GHz antenna for Bluetooth wireless communication and 2.4GHz wireless communication. With the help of them, the board is able to communicate with a variety of Bluetooth devices, including smart phones and tablets.
In this project, we mainly concentrate on the Bluetooth wireless communication function of this main board. Linked with Bluetooth, it can transmit code or signals. To this end, we should connect an Apple device (a phone or an iPad) to the board.
Since setting up Android phones to achieve wireless transmission is similar to that of Apple devices, no need to illustrate again.
(2) Preparation:
Attachment of the Micro:bit main board V2 to your computer via the Micro USB cable.
An Apple device (a phone or an iPad) or an Android device;
(3) Procedures:
For Apple devices, enter this link: https://www.microbit.org/get-started/user-guide/ble-ios/ with your computer first, and then click “Download pairing HEX file”to download the Micro: Bit firmware to a folder or desk, and upload the downloaded firmware to the Micro: Bit main board V2.


Search “micro bit” in your App Store to download the APP micro:bit.

Connect your Apple device with Micro: Bit main board V2:
Firstly, turn on the Bluetooth of your Apple device and open the APP micro:bit to select item “Choose micro:bit”to start pairing Bluetooth.
Please make sure that the Micro: Bit main board V2 and your computer are still linked via the USB cable.

Secondly, click “Pair a new micro:bit”;

Following the instructions to press button A and B at the same time(do not release them until you are told to) and press Reset & Power button for a few seconds.
Release the Reset & Power button, you will see a password pattern shows on the LED dot matrix. Now , release buttons A and B and click Next.


Set the password pattern on your Apple device as the same pattern showed on the matrix and click Next.

Still click Next and a dialog box props up as shown below. Then click “Pair”. A few seconds later, the match is done and the LED dot matrix displays the “√” pattern.

After the match with Bluetooth, write and upload code with the App.
Click “Create Code” to enter the programming page and write code.
Click  and the box
  appears, and then select “Create √”.


Name the code as “1 “and click  to save it.

Click the third item“Flash”to enter the uploading page. The default code program for uploading is the one saved just now and named “1” and then click the other “Flash” to upload the code program “1”.


If the code is uploaded successfully a few seconds later, the App will emerge as below and the LED dot matrix of the Micro: Bit main board V2 will exhibit a heart pattern.

Projects below all conduct with the built-in sensors and the LED dot matrix while the following ones will carry out with the help of external sensors.
(Attention:to avoid burning the the Micro:bit main board V2, please remove the USB cable and the external power from the board before fix it with a T-shaped shield; likewise, the USB cable and the external power should be cut from the main board before disconnect the shield from the board.)
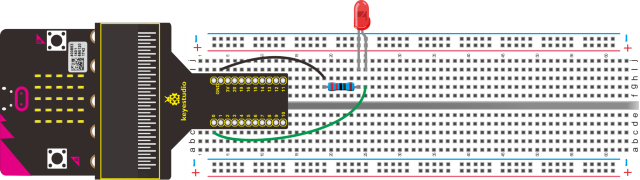
Project 13: LED Blinks
(1) Description:
Making LED blink is one of the primary project. We used to control the LEDs of the dot matrix built in the micro:bit board to flash. But in this lesson, we plan to link the board with an external LED and control it. Thus, we also need to block the dot matrix when we conduct this experiment.
(2) Knowledge:
About LED(light-emitting diode):


LED is a type of semiconductor called “Light Emitting Diode “which is an electronic device made of semiconductor materials (silicon, selenium, germanium, etc.). It features unidirectional conductivity, that is, the positive voltage is applied to the anode (long leg) and the cathode (short leg) of the diode. when the voltage of its anode is higher than the voltage of its cathode, thus, the diode is turned on(LED is on). When a reverse voltage is applied to the anode and cathode, the diode is disconnected(that is, the LED is off). Therefore, the disconnection and connection of the diode is equivalent to turning on and off LED. Light-emitting diodes have an anode (+) and a cathode (-), and they can only allow current to flow from one anode to the cathode. The components will be damaged if LED is directly connected to the power supply. It’s essential that a certain resistor must be connected in series in the LED circuit.
Resistor:
Resistor is the electronic component in the circuit, which limits and regulates current flow. Its unit is (Ω). 1 mΩ= 1000 kΩ,1kΩ= 1000Ω.


It is used to protect the sensitive elements, like LED. The color ring on its body represents a number. You could follows the resistor color chart.


Under the same voltage, there are smaller or higher current.
The relationship between current, voltage, and resistor can be expressed by the formula: I=U/R. In the figure below, the current flowing through R1: I = U / R = 3 V / 10 KΩ = 0.000 3A = 0.3mA.

Don’t connect resistor with low resistance to the ends of power, which will damage electronic components due to high current. There is no difference of positive or negative poles for resistors
Breadboard:
Breadboard is the essential tool in building circuit. The reasonable use of breadboard highly boost the efficiency.
Firstly, let’s learn the basic knowledge of breadboard.

A breadboard is used to build and test circuits quickly before finalizing any circuit design. The breadboard has many holes into which circuit components like ICs and resistors can be inserted. A typical breadboard is shown below:

The bread board has strips of metal which run underneath the board and connect the holes on the top of the board. The metal strips are laid out as shown below. Note that the top and bottom rows of holes are connected horizontally while the remaining holes are connected vertically.

To use the bread board, the legs of components are placed in the holes. Each set of holes connected by a metal a strip underneath forms anode.
A node is a point in a circuit where two components are connected. Connections between different components are formed by putting their legs in a common node.
The long top and bottom row of holes are usually used for power supply connections. The rest of the circuit is built by placing components and connecting them together with jumper wires.
ICs are placed in the middle of the board so that half of the legs are on side of the middle line and half on the other.
(3) Components List:
|
|
|
|
|---|---|---|---|
Micro:bit Board*1 |
Keyestudio Micro:bit T Type Shield |
Red LED*1 |
Micro USB Cable*1 |
|
|
|
|
220Ω Resistor*1 |
Breadboard*1 |
Breadboard Wire |

(4) Schematic Diagram:

(5) Wire-up Graph:

(5) Test Code:
Wire up in the terms of the above graph, LED is linked with P9, and power on.
A. Click “Led” → “more” → “led enable false”;
B. Place it into “on start” block

A. Enter “Advanced” → “Pins”,
B. Select “digital write pin P0 to 0” and leave it into “forever” block.

Set P9 because LED is attached to P9, and change 0 into 1.

A. Click “Basic” → “pause (ms) 100”;
B. Lay it down into“forever”block and set to 1000ms.
Copy once and alter 1 into 0(turn off LED). Then put it down below the“pause(ms)1000”.

Complete Program:
|
“on start”: command block runs once to start program. |
|---|

Select “JavaScript” and “Python” to switch into JavaScript and Python language code:


(6) Test Results:
Upload code and plug micro:bit to power, the external LED flashes at 1s interval.
(7) Extension Project:
Connect LED to P2 and make LED flicker at 0.5s interval.

Project 14:Traffic Light
(1) Description:
Traffic lights are closely related to people’s daily lives.
In the process of learning micro:bit board, we often use three external red, green and yellow LED circuits to simulate the roadside traffic lights. They traffic light is generally composed of red, yellow, and green (green is blue and green) lights, which is used to govern the traffic.
When the green light is on, vehicles are allowed to pass. When the yellow light is flashing, which warns that the signal is about to change to red, with some jurisdictions requiring drivers to stop if it is safe to do so, and others allowing drivers to go through the intersection if safe to do so.
When the red light is on, vehicles should stop then proceed when safe.
There are two types of traffic lights, the one is for motor vehicles are called motor vehicle lights.
Another one is the pedestrian crossing lights
(2) Components List:
|
|
|
|---|---|---|
Micro:bit Board*1 |
Keyestudio Micro:bit T Type Shield |
Micro USB Cable*1 |
|
|
|
220ΩResistor*3 |
Breadboard*1 |
Breadboard Wire |
|
|
|
Red LED*1 |
Yellow LED*1 |
Green LED*1 |
(3) Schematic Diagram:

(4) Wiring Graph:

(5) Test Code:
Hook the components up in compliance with the above diagram, separately connect green LED, yellow LED and red LED to P6, P4 and P2.
Click “Led”→”more”→“led enable false”;
(1) Combine it with“on start”.
(2) Enter “Advanced” → “Pins” → “digital write pin P0 to 0” into “forever”, and set to “digital write pin P6 to 1”.

(3) Go to“Basic”to drag out“pause (ms) 100”into“forever”block set to 500ms.

(4) Replicate “digital write pin P6 to 1” once and put it beneath the “pause(ms)5000” block, alter 1 into 0.

(5) Tap “Loops” to select “repeat 4 times do” and lay it down below the “digital write pin P6 to 0” block :

(6) Duplicate “pause (ms)5000” and  once again and keep them into“repeat 4 times do”. Yellow LED is linked with P4 and blinks 3 times, so set code string as follows:

(7) Copy  code string once, and set to P2, change the last 500 into 5000.
Complete Program:

Select “JavaScript” and “Python” to switch into JavaScript and Python language code:


(6) Test Results:
Upload code and plug micro:bit to power, the green LED stays on for 5s then goes off, next, yellow LED blinks for 3 times and red LED lights up for 5s then goes off, cyclically.
(7) Extension Project:
Simulate the traffic light, make green LED light up for 5s, then flicker for 3s and finally the red LED turns on.

Project 15:Flow Light
(1) Description:
Flow light, also called advertisement lights, emits light like flowing water.
In this project, we just need to add more LEDs and control the order and time to perform the phenomenon of flow light.
(2) Components List:
|
|
|
|
|---|---|---|---|
Micro:bit Board*1 |
Keyestudio Micro:bit T Type Shield |
Red LED*6 |
Micro USB Cable*1 |
|
|
|
|
220Ω Resistor*6 |
Breadboard*1 |
Breadboard Wire |
(3) Schematic Diagram:

(4) Wiring Graph:

(5) Test Code:
According to the above graph, 6 red LEDs are respectively attached to P2, P3, P4, P5, P6 and P7, enter Micro: bit MakeCode editor to design code:
Click “Led” → “more” → “led enable false”;
Combine it with “on start”
A. Enter “Advanced” → “Pins” → “digital write pin P0 to 0”
B. Drag it into “forever” and set to “digital…..P7…to 1”.
Go to“Basic”to drag out“pause (ms) 100”below the block digital…..P7…to 1”, then set to 500ms.

Copy code string
 for 5 times and, put it down into“forever”,separately set to P6, P5, P4, P3 and P2.
Then duplicate code string
 once, change 1 into 0.
Complete Program:
|
“on start”: |
|---|


Select “JavaScript” and “Python” to switch into JavaScript and Python language code:


(6) Test Results:
Upload code and plug micro:bit to power, the external LED lights up one by one, then gets dark orderly.
Project 16:Light Breathes
(1) Description:
In the previous lesson, we control LEDs on and off and make them blink.
In this project, we will control LED brightness through PWM to simulate breathing effect. Similarly, you can change the step length and delay time in the code so as to demonstrate different breathing effect.
PWM is a means of controlling the analog output via digital means. Digital control is used to generate square waves with different duty cycles (a signal that constantly switches between high and low levels) to control the analog output.In general, the input voltage of port are 0V and 5V. What if the 3V is required? Or what if switch among 1V, 3V and 3.5V? We can’t change resistor constantly. For this situation, we need to control by PWM.
For the Arduino digital port voltage output, there are only LOW and HIGH, which correspond to the voltage output of 0V and 5V. You can define LOW as 0 and HIGH as 1, and let the Arduino output five hundred 0 or 1 signals within 1 second.
If output five hundred 1, that is 5V; if all of which is 1, that is 0V. If output 010101010101 in this way then the output port is 2.5V, which is like showing movie. The movie we watch are not completely continuous. It actually outputs 25 pictures per second. In this case, the human can’t tell it, neither does PWM. If want different voltage, need to control the ratio of 0 and 1. The more 0,1 signals output per unit time, the more accurately control.

Pulse width modulation (PWM) has many applications: lamp brightness adjustment, motor speed adjustment, sound generation, etc. The following are the three basic parameters of PMW:

(1) Amplitude of pulse width (minimum/maximum)
(2) Pulse period (the reciprocal of pulse frequency within 1 second)
(3) Voltage level (for example: 0V-3V)
(4) Micro: There are 6 PMW interfaces , namely digital pins P0, P1, P2, P3, P4 and P10.
In this program, we connect red LED to P0 of micro:bit motherboard. And P0 can be input port as well. We could control LED brightness through P0 port. The LED will get bright gradually then dark, alternately, which looks like human breath.
(2) Components List:
|
|
|
|
|---|---|---|---|
Micro:bit Board*1 |
keyestudio Micro:bit T Type Shield |
Red LED*1 |
Breadboard wire |
|
|
|
|
220Ω Resistor*1 |
Breadboard*1 |
Micro USB Cable*1 |

(3) Schematic Diagram:

(4) Wiring Graph:
(5) Test Code:
From the above diagram, LED is connected to P0.
Enter micro:bit MakeCode editor
A. Click “Led”→”more”→“led enable false”;
B. Combine it with“on start”.
Go to“Loops”to move “while..true…do”into block“forever”. Then click“Logic”to drag“=”into“true”box.

(3) Click “Variables” → “Make a Variable…” → “New variable name:”box,input “brightness” in dialog box and tick “OK”, then the variable “brightness” is produced. Lay down “brightness” to the left box of “=”,change “0” into “1024”, “=” into “<”.

(4) A. Follow the above method to create variable“set brightness to 0”, and put it down into“do”block.
B. Enter“Math”to get“+”block and move it into“0” box ,
C. Move out variable“brightness”again into the left“0” box of block “+”, then alter 0 into 1.

(5) A. Go to“Advanced”→“Pins”→“analog write pin P0 to 1023”;
B. Keep it beneath the“set…brightness…1”block, then replace 1023 with“brightness”.

Go to “Basic” to drag out “pause (ms) 100” into “while…do” block set to 5ms.

Copy the code string once and place it into “do” block. Change “<” into “>”, 1024 into 0, “+” into “-”.

Complete Program:
|
“on start”: |
|---|

Select “JavaScript” and “Python” to switch into JavaScript and Python language code:


(6) Test Results:
Hook components up via connection diagram, upload the code and plug micro:bit to power. The external LED lights up gradually then gets dark, alternately, which looks like human breath.
(7) Extension Project:
The some LED on 5*5 dot matrix shows the breathing light effect.

Project 17:RGB
(1) Description:

The RGB color mode is a color standard in the industry. It obtains various colors by changing the three color channels of red (R), green (G), and blue (B) and integrating them. RGB denotes the three colors of red, green and blue. The monitors mostly adopt the RGB color standard, and all the colors on the computer screen are composed of the three colors of red, green and blue mixed in different proportions. A group of red, green and blue is the smallest display unit. Any color on the screen can be recorded and expressed by a set of RGB values.
Each of the three color channels of red, green, and blue is divided into 256 levels of brightness. At 0, the “light” is the weakest-it is turned off, and at 255, the “light” is the brightest. When the three-color gray values are the same, the gray tones with different gray values are produced, that is, when the three-color gray is 0, the darkest black is generated; when the three-color gray is 255, it is the brightest white tone .
RGB is inclusive of two types. In this project, we adopt a common cathode RGB module and connect it to P4, P3 and P3 of micro:bit board. The distinct color can be produced and displayed on RGB by changing the input values of P4, P3 and P2.

(2) Components List:
|
|
|
|
|---|---|---|---|
Micro:bit Board*1 |
keyestudio Micro:bit T Type Shield |
RGB*1 |
Micro USB Cable*1 |
|
|
|
|
220Ω Resistor*3 |
Breadboard*1 |
Breadboard wire |
(3) Schematic Diagram:

(4) Wiring Graph:

(5) Test Code:
Wiring according to the above diagram. The pins of RGB are linked with P4, P3 and P2. Connect computer to micro:bit motherboard with USB cable. Then enable Micro: bit online programming tool to design the code:
A. Click“Led”→“more”→“led enable false”
B. Drag “led enable false”into “on start”
A. Click “Advanced”→“Pins”→“analog write pin P0 to 1023 ”
B. Move it into“on start”block, and copy for 2 times.
C. The pins of RGB are separately connected to P4, P3 and P2. Therefore set to P2, P3 and P4. Then the RGB will show white light.

Copy “analog write pin P2 to 1023” once and leave it into “forever”, then change 1023 into 0.

A. Enter “Basic” → “pause (ms) 100”
B. Put “pause (ms) 100” below the block “analog write pin P2 to 0” block, and set to 1000ms.

Duplicate “analog write pin P2 to 1023” again, and place it as follows:

Replicate code string for 2 times, respectively set to P3 and P4. Then combine these code strings as shown below:

A. Click“Loops”→“repeat 4 times do”
B. Place it into“forever” block.
C. Then drag out the block“for index from 0 to 4…do ”from“Loops”, and move it into“repeat 4 times do”block

A. Copy “analog write pin P2 to 1023 ” once and leave it into “for index from 0 to 4…do” block.
B. Enter “Variables” → “index”;
C. Put it into “1023” box of “analog write pin P2 to 1023” block

A. Copy block“analog write pin P2 to index”once;
B. Set to P3 and delete the variable “index”
C. Go to“Math”→ “-”block
D. Leave it into“1023”box, and change left 0 into 1023
E. Move variable“index into right“0”box

A. Copy“analog write pin P3 to 1023-index”once
B. Click the triangle button to set P4
C. Change 1023 into 512.

A. Click “Basic” to drag out “pause (ms) 100”, then leave it below “analog write..P4.512…index” block. And set to 1ms.
B. Change “repeat 4 times” into “repeat 1 times”, “for index from 0 to 4” into “for index from 0 to 513”

A. Duplicate code string once and leave it into“repeat 1 times do”block.
Remove “index” behind P2, “1023-index” behind P3 and “512-index” behind P4.
Then respectively put down “index” into 1023 box behind P3, “512-index” into 1023 box behind P2 and “1023-index” into 1023 box behind P4.

A. Replicate code stringonce and place it into“repeat 1 times do”;
Remove “index” behind P2 , “1023-index” behind P3 and “512-index” behind P4.
Respectively drag them into 1023 boxes behind P4, P3 and P2.

Copy code string once and move into“forever” block
Complete Program:
|
“on start”: |
|---|


Select “JavaScript” and “Python” to switch into JavaScript and Python language code:


(6) Test Results:
Wire up, upload the code and plug micro:bit to power. The RGB begins to show white, blue, green and red color, alternately.
(7) Extension Project:
Make RGB display blue, green, red, yellow, purple and white color at the interval of 0.5s, alternately.


Project 18:Active Buzzer
(1) Description:
We can use micro:bit to make many interactive works of which the most commonly used is acoustic-optic display. All the previous projects have something to do with LED. However, the circuit in this experiment can produce sound. Normally, the experiment is done with a buzzer or a speaker because buzzer is more simpler and easier to use. The buzzer we introduced here is a passive buzzer. It cannot be actuated by itself, but by external pulse frequencies. Different frequencies produce different sounds. We can use micro:bit to code the melody of a song, which is quite fun and simple.
There are two kinds of buzzer, active buzzer and passive buzzer. In this lesson, we will use micro:bit to drive an active buzzer. The active buzzer inside has a simple oscillator circuit which can convert constant direct current into a certain frequency pulse signal. Once active buzzer receives a high level, it will produce an audible beep.
(2) Knowledge:
Triode:
Triode, also known as semiconductor triode, bipolar transistor and crystal triode, is a kind of current-controlled semiconductor device. Its function is to amplify weak signals into larger amplitude electrical signals, and also to be used as contact-less switches. Crystal triode is one of the basic components of semiconductor. It has the function of current amplification and is the core component of electronic circuit.
The triode is made of two PN junctions which are very close to each other on a semiconductor substrate. The two PN junctions divide the whole semiconductor into three parts, the middle part is the base area, the two sides are the emitter area and collector area, and the arrangement is PNP and NPN.
The NPN triode is composed of 2 N-type and P-type semiconductors, two of which are the launch area and the collect area. And the three pins are called E(Emitter), B (Base) and C (Collector).

The commonly used triodes are divided into PNP and NPN triodes.
The S8050 transistor is a low-power NPN silicon tube. The collector-base (Vcbo) voltage can be up to 40V, and the collector current is (Ic) 0.5A.
Its three pins are E(Emitter), B (Base) and C (Collector).


(3) Components List:
|
|
|
|
|---|---|---|---|
Micro:bit main board*1 |
keyestudio Micro:bit T Type Shield*1 |
Active Buzzer*1 |
2.4KΩ Resistor*1 |
|
|
|
|
S8050 triode*1 |
Breadboard*1 |
Breadboard wire |
Micro USB cable*1 |
|
|
|
|
Keyestudio Breadboard Power module*1 |
AA Battery Holder*6 |
AA Battery*6 |

(4) Schematic Diagram:

(5) Wiring Graph:

(6) Test Code:
Wiring through the above graph, active buzzer is linked with P2. Link computer with micro:bit board. Then enable the online programming tool to design the code.
Click “Led”→”more”→“led enable false”
Combine it with “on start”.
A. Go to“Advanced”→“Pins”→“digital write pin P0 to 0 ”;
B. Leave it into“forever” , and active buzzer is connected to P2, so set to P2, change o into 1.

(3) Click “Basic” to move “pause (ms) 100” block below “digital write…P2 to 1” block, set to 500ms.

(4) Duplicate the code string  once and move it below “pause(ms)500”block. Then change 1 into 0.

Complete Program:
|
“on start”: command block runs once to start program. |
|---|

Select “JavaScript” and “Python” to switch into JavaScript and Python language code:


(7) Test Results:
Upload program and plug micro:bit to power. Active buzzer emits sound for 0.5s, and stops for 0.5s, cyclically.
(8) Extension Project:
Shift the IO port of active buzzer, it makes sound for 0.2s alternately.

Project 19:Passive Buzzer
(1) Description:
We can use micro:bit board to make many interactive works of which the most commonly used is acoustic-optic display. The previous lessons are related to LED. However, we will elaborate the Sound in this lesson.
Buzzer is inclusive of active buzzer and passive buzzer.
The passive buzzer doesn’t carry with vibrator inside, so it need external sine or square wave to drive. It can produce slight sound when connecting directly to power supply. It features controlling sound frequency and producing the sound of “do re mi fa so la si”.
A diode should be connected in reverse when driving by the square wave signal source, which will hinder the high-voltage generated to damage other components or service life when the power breaks down.
Frequency is made of a series of pitch names in English letters and Numbers. You can choose different frequencies, that is, tone. The frequency of sound is called pitch.
It involves music knowledge.
In music lesson, our teacher taught“1(Do), 2(Re), 3(Mi), 4(Fa) , 5(Sol), 6(La), 7(Si)”
1(Do) |
2(Re) |
3(Mi) |
4(Fa) |
5(Sol) |
6(La) |
7(Si) |
|---|---|---|---|---|---|---|
C |
D |
E |
F |
G |
A |
B |
The number depends on high or low tone. The larger the number, the higher the tone. When the number is same, the frequency (tone) is getting higher and higher from C to _B.
Beats are the time delay for each note. The larger the number, the longer the delay time. A note without a line in the spectrum is a beat, with a delay of 1000 milliseconds. while a beat with an underline is 1/2 of a beat without a line, and a beat with two underlines is 1/4 of a beat without a line.

Here is the notation of Ode to Joy.

(2) Component List:
|
|
|
|
|---|---|---|---|
Micro:bit Board*1 |
keyestudio Micro:bitT Type Shield*1 |
Passive Buzzer*1 |
2.4KΩResistor*1 |
|
|
|
|
S8050 Triode*1 |
AA Battery Holder*6 |
Breadboard Wire |
Micro USB Cable*1 |
|
|
|
|
Breadboard*1 |
Keyestudio Power module for breadboard*1 |
51ΩResistor*1 |
AA Battery*6 |

(3) Schematic Diagram:
(Note:On micro:bit motherboard,Passive Buzzer is only connected to P0)

(4) Wiring Graph:

(5) Test Code:
Wiring through the above graph, passive buzzer is linked with P0. Link computer with micro:bit board and program in MakeCode editor.
Click “Led”→”more”→“led enable false”, combine it with “on start”.
Enter “Music” → “play tone Middle C for 1 beat”, leave it into “forever” block, then tap “Middle C”, then appear code.
code.
Choose “High E” and set to “1 beat”.


According to the above music score. Copy “play tone High E for 1 beat” 124 times, separately change “High E” of “play tone High E for 1 beat” into “High E”, “High F”, “High G”, “High G”, “High F”, “High E”, “High D”, “High C”, “High C”, “High D”, “High E”, “High E”, “High D”, “High D”, “High E”, “High E”, “High F”, “High G”, “High G”, “High F”, “High E”, “High D”, “High C”, “High C”, “High D”, “High E”, “High D”, “High C”, “High C”, “High D”, “High D”, “High E”, “High C”, “High D”, “High E”, “High F”, “High E”, “High C”, “High D”, “High E”, “High F”, “High E”, “High D”, “High C”, “High D”, “Middle G ”, “High E”, “High E”, “High E”, “High F”, “High G”, “High G”, “High F”, “High E”, “High D”, “High C”, “High C”, “High D”, “High E”, “High D”, “High C”, “High C”, “High D”, “High D”, “High E”, “High C”, “High D”, “High E”, “High F”, “High E”, “High C”, “High D”, “High E”, “High F”, “High E”, “High D”, “High C”, “High D”, “Middle G”, “High E”, “High E”, “High E”, “High F”, “High G”, “High G”, “High F”, “High E”, “High C”, “High C”, “High C”, “High D”, “High E”, “High D”, “High C”, “High C”, “High D”, “High C”, “High C”, “High G”, “High F”, “High E”, “High E”, “High C”, “High B”, “High A”, “High A”, “High F”, “High D”, “High C”, “Middle B”, “High D”, “Middle B”, “Middle A”, “Middle G”, “Middle A”, “Middle B”, “High C”, “High E”, “High D”, “Middle B”, “High C”, “High C”, “High C”, “High C”.
Then set beat to “1”, “1”, “1”, “1”, “1”, “1”, “1”, “1”, “1”, “1”, “1”, “1”, “1/2”, “1”, “1”, “1”, “1”, “1”, “1”, “1”, “1”, “1”, “1”, “1”, “1”, “1”, “1”, “1/2”, “1”, “1”, “1”, “1”, “1”, “1”, “1/2”, “1/2”, “1”, “1”, “1”, “1/2”, “1/2”, “1”, “1”, “1”, “1”, “1”, “1”, “1”, “1”, “1”, “1”, “1”, “1”, “1”, “1”, “1”, “1”, “1”, “1”, “1”, “1/2”, “1”, “1”, “1”, “1”, “1”, “1”, “1/2”, “1/2”, “1”, “1”, “1”, “1/2”, “1/2”, “1”, “1”, “1”, “1”, “1”, “1”, “1”, “1”, “1”, “1”, “1”, “1”, “1”, “1”, “1”, “1”, “1”, “1”, “1”, “1/2”, “1”, “1”, “1/2”, “1”, “1”, “1”, “1/2”, “1”, “1”, “1”, “1/2”, “1”, “1/2”, “1/2”, “1/2”, “1/2”, “1/2”, “1/2”, “1/2”, “1/2”, “1/2”, “1/2”, “1/2”, “1/2”, “1/2”, “1/2”, “1”, “1/2”, “1/4”, “1”.
Complete Program:
|
|---|


Select “JavaScript” and “Python” to switch into JavaScript and Python language code:


(6) Test Results:
Wire up through the above graph and plug micro:bit to power. The“Ode to Joy”is played by passive buzzer.
(7) Extension Project:
Make passive buzzer emit two kind sounds.

Project 20:1-Digit Tube Module
(1) Description:
LED segment display is a semiconductor light-emitting device. Its basic unit is a light-emitting diode (LED). LED segment display can be divided into 7-segment display and 8-segment display according to the number of segments. 8-segment display has one more LED unit ( for decimal point display) than 7-segment one. In this experiment, we use a 8-segment display. According to the wiring method of LED units, LED segment displays can be divided into display with common anode and display with common cathode. Common anode display refers to the one that combine all the anodes of LED units into one common anode (COM). For the common anode display, connect the common anode (COM) to +3V. When the cathode level of a certain segment is low, the segment is on; when the cathode level of a certain segment is high, the segment is off. For the common cathode display, connect the common cathode (COM) to GND. When the anode level of a certain segment is high, the segment is on; when the anode level of a certain segment is low, the segment is off.
The anodes of each LED are a,b,c,d,e,f,g and dp((decimal point). There are 2 segments to show number and one segment to display decimal point. In this project, we use a common anode 8-segment display. The each pin of anode must be connected to 220Ω resistor.
1-digit tube module has 8 light-emitting diodes (LED) corresponding to 8 pins. As shown below, light emitting diode a equals to pin a, LED b is equivalent to pin b, and so on. Connect pin a to P13 on the micro:bit motherboard, pin b to P14, pin c to P8, pin d to P9, pin e to P10, pin f to P12, and pin g Connect to P11, pin dp to P7, as long as you control the high and low level of the corresponding interface, you can control the display of the digital tube. In the experiment, we let the digital tube gradually display 10 numbers from 0-9.


(2) Components List:
|
|
|
|
|---|---|---|---|
Micro:bit Board*1 |
keyestudio Micro:bit T Type Shield*1 |
1 Digit Tube Module*1 |
220ΩResistor*8 |
|
|
|
|
Breadboard*1 |
Micro USB Cable*1 |
Breadboard Wire |

(3) Schematic Diagram:

(4) Wiring Graph:

(5) Test Code:
Link computer with micro:bit board and program in MakeCode editor
A. Click“Led”→“more”→“led enable false”;
B. Place it into“on start”
A . Enter “Advanced”→“Functions”→“Make a Functions…”→“Edit Function”dialog box
B. For block , change“do something”into “0” and click “Done √”. Then“function 0”block is created.
A. Click “Advanced” → “Pins” → “digital write pin P0 to 0”,
B. Copy it for 7 times and put these code string into“function 0”block.
C. The pins of 1-digit tube module are connected to P13, P14, P8, P9, P10, P12, P11and P7 .
D. Thereby, set to P13, P14, P8, P9, P10, P12, P11and P7 respectively. Then set to 1 from P13 to P12. And remain 0 for P11and P7 .

Then replicate the code string  for 9 times, and design the code as follows:

Next click “Advanced” and enter “Functions” to find out function block“call 0”, and leave it into “forever”, block “call 0” equals to code string , and “call 1” is equivalent to code string  and so on. move
block “pause (ms) 100” from “Basic” and place it below the “call 0”, then set to 500ms.
and so on. move
block “pause (ms) 100” from “Basic” and place it below the “call 0”, then set to 500ms.

Enter “Advanced” and go to “Functions”, drag out the function block “call 1”, “call 2”, “call 3”, “call 4”, “call 5”, “call 6”, “call 7”, “call 8” and “call 9” beneath the block “pause(ms) 500”.

Then replicate “pause (ms) 500” for 9times and place them into every “call“ block.

Complete Program:
|
|---|


Select “JavaScript” and “Python” to switch into JavaScript and Python language code:


(6) Test Results:
Hook components up according to diagram, upload the code and plug micro:bit to power, the digital tube displays from the number 0 to 9 cyclically.
Project 21:4-Digit Tube Module
(1) Description:
The 4-digit digital tube module is mainly composed of a 12pin 4-digit common anode digital tube with a score point. Its driver chip is TM1637.
When in use, we only to make the single-chip microcomputer control a 4-digit or 8-digital tube by 2 signal lines, which greatly saves the IO port resources of the control board.
The control terminal interface of the module is a 4pin header with a pitch of 2.54mm, which facilitates to link with the corresponding control microcontroller.
What’s more, the 2 positioning holes of module make it easier to install on the other devices.
This module can be applied to time display, stopwatch display and other devices that need to display numbers.
In this project, we connect the keyestudio 4-digit digital tube module to the keyestudio micro:bit T Type Shield through the Breadboard, and control the 4-digit digital tube module to display numbers through the micro:bit motherboard and programming.
(2) Components List:
|
|
|
|---|---|---|
Micro:bit Board*1 |
keyestudio Micro:bit T Type Shield*1 |
M-F Dupont Lines |
|
|
|
Keyestudio 4-digit Tube Module |
Breadboard*1 |
Micro USB Cable*1 |
(3) Schematic Diagram:

(4) Wiring Graph:

(5) Test Code:
Code 1:
Wiring according to the above diagram, CLK and DIO pins of 4-digit tube module are respectively connected to P1 and P2.
Link computer with micro:bit board. Then enable the online programming tool to design the code.
How to add the library file of 4-digit tube module:
Enter the micro:bit online programming page and click“Extensions”

Input TM1637 to search, as shown below and click to download and install the library file.

After installing 4-digit library file successfully, then the corresponding code is shown in the editing area:

Click“Variables”→“Make a Variable…”→“New variable name:”
Enter“item”in the dialog box and click “OK”, then variable“item”is created
Drag“set item to 0”from “Variable”into “on start”block.

Click “8 TM1637” block and move “CLK P1 DIO P2 intensity 7 LED count 4” to the 0 box of “set item to 0”.

Enter “8 TM1637” to select “turn on item” block, and place it into “forever” block.

Click “Basic” to move “pause (ms) 100” block below “turn on item” block and set to 200ms. Then copy it once.

Go to “8 TM1637” to find out block “item show digit 5 at 0 ”, then place it between the two “pause (ms) 200” blocks.

Copy the code string  for 3 times, and move them into“forever”block. Set to “at 1, at 2, at 3”, as shown below:

Drag “turn off item” from “8 TM1637” into “forever” block. Duplicate “pause (ms) 200” once and leave it beneath block “turn off item”.

Complete Program:
|
“on start”: command block runs once to start program. |
|---|

Select “JavaScript” and “Python” to switch into JavaScript and Python language code:


Code 2:
Wire components up in compliance with the above graph, the CLK and DIO pins of 4-digit tube module are linked with P1 and P2.
Connect computer to micro:bit board and program in MakeCode editor.
We’ve added the library file in“Code 1”part. Let’s get started.
Click“Variables”→“Make a Variable…”→“New variable name:”
Enter“item”in the dialog box and click “OK”, then variable“item”is created.
Drag“set item to 0”from “Variable”into“on start”block.
Click“8 TM1637”block and move“CLK P1 DIO P2 intensity 7 LED count 4”to the 0 box of“set item to 0”.
Enter“8 TM1637”to select“item show number 0”block, and place it into“on start”block

Go to“8 TM1637”to move“item DotPoint at 1 true”into “forever”block

Click“Basic”to drag“pause (ms) 100”block below the block “item DotPoint at 1 true”, then set to 200ms.

Copy the code string once and
leave it below the “pause(ms)200”,click the button next to“true”to select“false”.
once and
leave it below the “pause(ms)200”,click the button next to“true”to select“false”.

Complete Program:
|
“on start”: command block runs once to start program. |
|---|

Select“JavaScript” and“Python”to switch into JavaScript and Python language code:


(6) Test Results:
Wire up via diagram, upload code 1 and plug micro:bit to power, the 4-digit tube module shows“5”from 0 bit to the third bit (From left to right are 0, 1, 2, and 3 bits). then the number“5555” flashes.
Upload code 2, the character string“13:14”is shown and the middle symbol ”:”flashes.
Project 22:8*8 Dot Matrix
(1) Description:
8x8 Dot matrix module can be used as display screen, like bus station display, advertising screens and bulletin boards.
On the screen there are 64 circles. And inside each circle has an LED light. There are 64 LEDs, pins on the side, 8 on each. You can see other models like 16x16 Dot matrix, 32x32 Dot matrix.
These 64 LEDs can be lit separately, or lit together. Lighten different LED to show different icons.
The single 8x8 dot matrix comes with 8 LEDs on each row and each cols. There are 16 pins on the side, 8 on each.
Connect all the positive pins or negative pins of 8 LEDs on each row, leading out a line; and the pins not connected on each cols also connect together, leading out a line; so the single dot matrix screen has 16 pins.
In this lesson, we will make dot matrix show.


(2) Components List:
|
|
|
|
|---|---|---|---|
Micro:bit Board*1 |
Keyestudio Micro:bit T Type Shield*1 |
8*8 Dot Matrix *1 |
220ΩResistor*8 |
|
|
|
|
Breadboard*1 |
Micro USB Cable*1 |
Breadboard Wire |
(3) Schematic Diagram:

(4) Wiring Graph:

(5) Test Code:
Wiring according to the above connection diagram. Link computer with micro:bit board. Then enable the online programming tool to design the code.
A. Click “Led”→”more”→“led enable false”;
B. Combine it with “on start”.
Enter “Advanced”→“Pins”→“digital write pin P0 to 0”, Then drag it into“forever”.
Seen from the above the graph, the pin B of 8*8 dot matrix is connected to P5, click the drop-down triangle to set P5.

Copy “digital write pin P5 to 0” for 9 times. The pins of dot matrix are connected the corresponding ports are displayed as follows:
Pins of dot matrix |
Connected Pins |
|---|---|
G |
P14 |
7 |
P3 |
6 |
P6 |
5 |
P1 |
4 |
P7 |
3 |
P11 |
0 |
P8 |
1 |
P13 |
2 |
P0 |
Then respectively set to P14, P3, P6, P1…..P0. and remain 1 from P3 to P8(as shown below).

Complete Program:
|
“on start”: command block runs once to start program. |
|---|

Select “JavaScript” and “Python” to switch into JavaScript and Python language code:


(6) Test Results:
Upload the entire program and plug micro:bit to power, the number is displayed on dot matrix.
(7) Extension Project:
Change the above code to make 8*8 Dot matrix display the Chinese “二”.

Project 23:Control Flow Light by 74HC595N
(1) Description:
To put it simply, 74HC595 is a combination of 8-digit shifting register, memorizer and equipped with tri-state output. Here, we use it to control 8 LEDs. You may wonder why use a 74HC595 to control LED? Well, think about how many I/O it takes for an Arduino to control 8 LEDs? Yes, 8. For an Arduino, it has only 20 I/O including analog ports. So, to save port resources, we use 74HC595 to reduce the number of ports it needs. Using 74HC595 enables us to use 3 digital I/O port to control 8 LEDs!
The 74HC595 devices contain an 8-bit serial-in, parallel-out shift register that feeds an 8-bit D-type storage register. The storage register has parallel 3-state outputs. Separate clocks are provided for both the shift and storage register. The shift register has a direct overriding clear (SRCLR) input, serial (SER) input, and serial outputs for cascading. When the output-enable (OE) input is high, the outputs are in the high-impedance state. Both the shift register clock (SRCLK) and storage register clock (RCLK) are positive-edge triggered. If both clocks are connected together, the shift register always is one clock pulse ahead of the storage register.


PIN |
DESCRIPTION |
|---|---|
13 pin OE |
The output Enable is used to turn off the outputs. Must be held low for normal operation |
14 pin SI |
It it the pin receiving data of 74HC595. |
10 pin SCLR |
Clear all the data in the shift register. when it is low level. |
11 pin SCK |
This is the clock pin to which the clock signal has to be provided from MCU/MPU |
12 pin RCK |
The Latch pin is used to update the data to the output pins. It is active high |
9 pin SQH |
This pin is used to connect more than one 74hc595 as cascading |
(2) Components List:
|
|
|
|
|---|---|---|---|
Micro:bit Board*1 |
keyestudio Micro:bit T Type Shield*1 |
Red LED*8 |
220ΩResistor*8 |
|
|
|
|
74HC595N Chip*1 |
Breadboard*1 |
Breadboard Wire |
Micro USB Cable*1 |
(3) Wiring Graph:


(4) Test Code:
Wiring according to the above connection diagram. Therefore, SI, RCK, and SCK pins of 74HC595N are linked with P0, P1 and P2. Link computer with micro:bit board. Then enable the online programming tool to design the code.
How to add the 74HC595N library file
Enter the micro:bit online programming page and click “Extensions”
Click “Extensions” to add the library file.

Enter 74hc595 to search, as shown below. Click library file to download and install library file automatically.

The corresponding block appears in the code-editing area, after successful installation

A. Click “Led”→”more”→“led enable false”;
B. Combine it with “on start”.
Click“Freenove”→“Shift Out”to drag“set 74hc595 data pin at P0 launch pin at P0 clock pin at P0”into“on start”.
Pin S1 of 74HC595N chip is connected to P0, RCK is linked with P1, SCK with P2. (Note: data pin equals to pin S1, launch pin is given to RCK, clock pin is SCK.)
Therefore, we set block to set 74hc595 data pin at P0 launch pin at P1 clock pin at P2

A. Go to “Freenove” → “Shift Out” → “write 0 from highest bit”;
B. Leave it into“forever”and change 0 into 255.

Drag out “pause (ms) 100” from “Basic”block, then place it into “forever”and set to 300ms.

Duplicate code string for 8 times. And separately alter 255 into 127, 63, 31, 15, 7, 3, 1 and 0.

Complete Program:
|
“on start”: command block runs once to start program. |
|---|


Click “JavaScript”, you will view the corresponding JavaScript code:

Then click drop-down triangle button and select “Python” to see the Python language code:

(5) Test Results:
Upload the program and plug micro:bit to power, 8 LEDs start lighting up together then go off one by one,alternately.
(6) Extension Project:
8 LEDs light up together then go off at same time.

Project 24:1602 LCD Display
(1) Description:
keyestudio 1602 I2C module is a 16 character by 2 line LCD display with Blue background and White backlight. The original 1602 LCD needs 7 IO ports to be up and running, but ours is built with Arduino IIC/I2C interface, saving you 5 IO ports. This LCD is ready-to-use because it is compatible with the Arduino Liquid Crystal Library. LCDs are great for printing data and showing values. Adding an LCD to your project will make it super portable and allow you to integrate up to 32 characters (16x2) of information. On the back of LCD display there is a blue potentiometer. You can turn the potentiometer to adjust the contrast. Notice that the screen will get brighter or darker and that the characters become more visible or less visible.
(2) Components list:
|
|
|
|
|---|---|---|---|
micro:bit Control Board*1 |
Keyestudio Micro bit T Type Shield*1 |
AA Battery*6 |
Breadboard Wire |
|
|
|
|
Breadboard*1 |
6 AA Battery Holder*1 |
M-F Dupont Line |
Micro USB Cable*1 |
|
|
||
Keyestudio Power Module for Breadboard*1 |
Keyestudio 1602 LCD Display Module*1 |
(3) Schematic Diagram:

(4) Wiring Diagram:

(5) Test Code:
Wire components up according to the above connection diagram, the pin SDA and SCL of 1602 LCD are attached to P20 and P19. Link computer with micro:bit board. Then enable the online programming tool to design the code.
How to add the library file of 1602 LED Display
Enter the micro:bit online programming page and click “Extensions”.
Enter the link of library file: https://github.com/xuefengedu/pxt-lcd1602_CN, then click the file to install it.

The library file is installed, you could see the corresponding blocks in the editing column.

Click“Led”→”more”to get block“led enable false”, combine it with “on start”.
Click“LCD1602”to move out“LCD1602 I2C address 0x27”
Leave it into on start block
Then drag out“LCD show string””on x: 0 y: 0”below the block “LCD1602 I2C address 0x27”
Set to x:3, y:0

A. Enter“LCD1602”→“set string visibled”
B. Then find out“set LED backlight on”and leave it below block “set string visibled”

Click“Variables”→“Make a Variable…” →“New variable name”box
Put in“Value”, then variable“Value”is created.
Drag out “set Value to 0”below the block“set LED backlight on”

Click“Variables”to get block“change Value by 1”and keep it into “forever”block.

A. Enter“LCD1602”to get block“LCD show number 0 on x: 0 y: 0”
B. Leave it beneath the block “change value by 1”
C. Set to x:7, y:1

Go to “Basic”block to drag out“pause (ms) 100”, and set to 500ms

Complete Program:
|
“on start”: command block runs once to start program. |
|---|

Click “JavaScript”, you will view the corresponding JavaScript code:

Then click drop-down triangle button to select“Python”to see the Python language code:

(6) Test Results:
Wire up through the connection diagram, upload code and plug micro:bit to power. The character “Keyestudio” is displayed on the first row of 1602 LCD display and the number is shown and plus 1 on second row for every 1s
(7) Extension Practice:
1602LCD display module shows “123” and “Hello” then numbers.

Project 25:Servo Control
(1) Description:
When we make robot car, we often control doors and windows with servos. In this course, we’ll introduce its principle and how to use servo motors.
Servo motor is a position control rotary actuator. It mainly consists of housing, circuit board, core-less motor, gear and position sensor. Its working principle is that the servo receives the signal sent by MCU or receiver and produces a reference signal with a period of 20ms and width of 1.5ms, then compares the acquired DC bias voltage to the voltage of the potentiometer and obtain the voltage difference output.
The IC on the circuit board determines the direction of rotation, and drives the coreless motor to start rotating. The power is transmitted to the swing arm through the reduction gear. At the same time, the position detector sends back a signal to determine whether the positioning has been reached. It is suitable for those control systems that require constant change of angle and can be maintained.
When the motor speed is constant, the potentiometer is driven to rotate through the cascade reduction gear, which leads that the voltage difference is 0, and the motor stops rotating. Generally, the angle range of servo rotation is 0° –180 °
Servo motor has external 3pcs lines which are distinguished from brown, red and orange color. Brown line is grounded, red one is positive power line and the orange is signal line.
The rotation angle of servo motor is controlled by regulating the duty cycle of PWM (Pulse-Width Modulation) signal. The standard cycle of PWM signal is 20ms (50Hz). Theoretically, the width is distributed between 1ms-2ms, but in fact, it’s between 0.5ms-2.5ms. The width corresponds the rotation angle from 0° to 180°. But note that for different brand motor, the same signal may have different rotation angle.

There are two ways to control servo motor by micro:bit board.
One is to use a common digital sensor port of micro:bit board to produce square wave with different duty cycle to simulate PWM signal and use that signal to control the positioning of the motor.
Another way is to directly use the servo function of the micro:bit board to control the motor. However, you need to control more than one motor by external power as the drive capacity of micro:bit board is limited.
Note that don’t supply power through USB cable. There is possibility to damage the USB cable if the current demand is greater than 500MA. We recommend the external power.
(2) Components List:
|
|
|
|---|---|---|
Micro:bit Board*1 |
keyestudio Micro:bit T Type Shield*1 |
keyestudio Micro Servo Motor*1 |
|
|
|
AA Battery *6 |
Breadboard*1 |
6 AA Battery Holder*1 |
|
|
|
Breadboard Wire |
Micro USB Cable*1 |
Keyestudio Breadboard Specialized Power Module*1 |
(3) Schematic Diagram:
Note: wire up servo with breadboard with 3 pcs dupont lines.

(4) Wiring Graph:
Note: wire up servo with breadboard with 3 pcs dupont lines.

(5) Test Code:
Wire up through the connection diagram and connect servo motor to P3, Link computer with micro:bit board and program in MakeCode editor.
(1)A. Click “Led”→”more”→“led enable false”,
B. Combine it with“on start”.

(2)Drag out “servo write pin P0 to 180” from “Pins” block under the block “Advanced”. Keep it into “forever”. Servo motor is connected to P3, so set to P3 and change 180 into 0.
(3)Enter “Basic” to drag out “pause (ms) 100” into “on start”, set to 200ms.

(4) Copy  for 5 times and place them into “forever”, separately set to 0, 45, 90, 135 and 180. Then change 200ms into 1000ms.

Complete Program:
|
“on start”: command block runs once to start program. |
|---|

Select “JavaScript” and “Python” to switch into JavaScript and Python language code:


(6) Test Results:
Wire up through the connection diagram, upload the program and plug micro:bit to power. Servo motor swings to and fro in the range of 0°~45°~90°~135°~180°
(7) Extension Project:
Servo motor swings to and fro in the range of 0°~90°

Project 26:L293D Driver Motor
(1) Description:
L293D is a direct current drive IC, which can be used to drive DC motor or stepper motor in some robot projects.
It has a total of 16 pins and can drive two-channel DC motors at the same time.
Its Input voltage range is 4.5 V ~ 36 V, the output current of per channel is MAX 600mA, which can drive inductive loads. What’s more, its input end can be directly connected and controlled by the single-chip microcomputer.
When driving a small DC motor, the control of two-channel motors and the forward and reverse rotation can be realized by changing the high and low level of the input terminal. There are many motor drive boards using L293D chips on the market, of course, we can also use it via simply connecting.
(2) Pins Description:

No |
Name |
Description |
|---|---|---|
1 |
Enable1,2 |
Enable pin Input 1(2)and Input 2(7) |
2 |
Input1 |
Directly input pin 1via digital circuit |
3 |
Output1 |
Connected to one end of motor1 |
4 |
GND |
Grounded(0V) |
5 |
GND |
Grounded(0V) |
6 |
Output2 |
Connected to one end of motor1 |
7 |
Input2 |
Directly output pin 2 via digital circuit |
8 |
Vcc2(Vss) |
Connected to voltage pin of motor(4.5V-36V) |
9 |
Enable3,4 |
Enable pin 3(10)and 4(15) |
10 |
Input3 |
Input3 pin, controlled by digital circuit |
11 |
Output3 |
Connected to one end of motor2 |
12 |
GND |
Grounded(0V) |
13 |
GND |
Grounded(0V) |
14 |
Output4 |
Connected to one end of motor2 |
15 |
Input4 |
Input4 pin, controlled by digital circuit |
16 |
Vcc1(Vss) |
Connect + 5Vto enable IC function |
(3) Components List:
|
|
|
|
|---|---|---|---|
Micro:bit Board*1 |
Keyestudio Micro:bit |
L293D Drive Chip*1 |
Fan*1 |
|
|
|
|
DC Motor*1 |
Breadboard*1 |
6 AA Battery Holder*1 |
Micro USB Cable*1 |
|
|
|
|
Keyestudio Breadboard |
AA Battery*6 |
Breadboard Wire |
(4) Schematic Diagram:

(5) Wiring Graph:

(6) Test Code:
Wire components up according to the above connection diagram, the ernable3 and 4, Input3 and Input4 of L293D drive chip are connected to P0, P1 and P2. What’s more, the red line and black line of motor are attached to Onput3 and Onput4. Link computer with micro:bit board and program in MakeCode editor.
(1)A.Click“Led”→“more”→“led enable false”
B. Put it into the block“on start”
(2)

Enter“Advanced”→“Pins”→“analog write pin P0 to 1023”
Place it into“forever”block
Change 1023 into 800
(3)A. Go to“Advanced”→“Pins”→“digital write pin P0 to 0”
B. Place it into“forever”block
C. Copy“digital write pin P0 to 0”once
D. L293D is attached to P1 and P2, set to P1 and P2. And change 0 into 1 for P1

(4)
Go to“Basic”→“pause (ms) 100”
Keep it below block “digital write pin P2 to 0”and set to 1000ms

(5) Duplicate code string  once and place it into “forever”, change 1 into 0 for P1, 0 into 1 for P2.

Complete Program:
|
“on start”: command block runs once to start program. |
|---|

Select “JavaScript” and “Python” to switch into JavaScript and Python language code:


(7) Test Results:
Download the program and plug micro:bit to power, the motor spins clockwise for 1s and anticlockwise for 1s, alternately.
Project 27:Desk Lamp
(1) Description:
The button switch is the most universal component in the circuit. In the project 4, we have elaborated the working principle of the button switch. In this lesson, we will use an external button to control an external LED.
(2) Components List:
|
|
|
|
|
|---|---|---|---|---|
Micro:bit Board*1 |
keyestudio Micro:bit T Type Shield*1 |
10KΩResistor*1 |
220ΩResistor*1 |
Red LED*1 |
|
|
|
|
|
Micro USB Cable*1 |
Breadboard*1 |
Breadboard Wire |
Button*1 |
Button Cap*1 |


(3) Schematic Diagram:

(4) Wiring Graph:

(5) Test Code:
Code 1:
Wiring according to the above diagram. Button is connected to P0. Link computer with micro:bit board and program in MakeCode editor.
(1)A. Click“Basic”→“more”→“clear screen”;
B. Put it into the block“on start”.

(2)Drag“show number 0”from“Basic”and place it into“forever”block.

(3) A. Enter “Advanced” → “Pins” → “digital read pin P0 ”;
B. Leave it into the 0 box.

(4) Go to“Basic” to drag “pause (ms) 100” into “forever”, set to 100ms.

(5) A. Click “Serial” under the “Advanced” block, and get “serial write value“x”=0”, leave it below the block “pause(ms)100”.
B. Change “x” into “digital signal”.
C. Copy “digital read pin P0” once and keep it into “0” box of “serial write value“x”=0”.

Complete Program:
|
“on start”: |
|---|

Select “JavaScript” and “Python” to switch into JavaScript and Python language code:


Wire up through the connection diagram, upload code, power on and open CoolTerm, click Options to select SerialPort. Set COM port and baud rate is 115200 (the baud rate of USB serial communication of micro:bit is 115200 through the test). Click “OK” and “Connect”. When the button is pressed, button sends 1 and serial port and micro:bit board display 1; when unpressed, the button sends 0, 0 are shown on serial port and micro:bit board.

Code 2:
Hook components up according to the above connection diagram, red LED and button switch are connected to P4 and P0 respectively.
Link computer with micro:bit board and program in MakeCode editor.
(1)A. Click “Led”→”more”→“led enable false”,
B. Combine it with“on start”.
(2) A. Enter “Variables”→“Make a Variable…”→“New variable name:”;
B. Then input“Push Counter”in the blank box and click “OK” to create variable“PushCounter”. In addition, both variables“State”and“Laststate”can be generated in same way.
C. Drag “set Laststate to 0”into“on start”and copy it twice. Respectively click drop-down triangle button to choose “PushCounter”and“State”. As shown below:

(3) Click“Serial”under the block“Advanced”to drag“serial write value“x”=0” into “forever”. Then go to“Variables”to move“PushCounter”into 0 box.

(4) A. Click“Variables”to move“set Laststate to 0”into “forever”.
B. Click the drop-down triangle button to select“State”;
C. Then enter“Advanced”→“Pins”→“digital read pin P0 ”
D. Place“digital read pin P0 ”into“0” box

(5) A. Go to “Logic” → “if..true..then” block and “=”.
B. Leave “if..true..then” beneath the “set..digital…pin P0” block . Then move out “=” into “true” box.

(6) Click “Variables” to get “State”, then place it at the left “0” box. Then move out “Laststate” to right 0 box.
Then click the drop-down triangle button to set “≠”.

(7)Copy  once and place it into “if State≠Laststate then” block, delete “Laststate”, change 0 into 1, click the drop-down triangle button to select “=”.

(8)A.Replicate “set PushCounter to 0” once and put it into block “if State=1 then” block.
B. Then go to “Math” to drag out “+”
C. Click“Variables”to move out“PushCounter”to the left box 0 of “+”, and change right 0 into 1.

(9)A. Click“Basic”to drag out“pause (ms) 100”into“forever”;
B. Then copy“set Laststate to 0”once and leave it beneath the“pause (ms) 100”. Then drag out“State”to replace 0.

(10)A. Go to“Logic”→“if..true…then…else”
B. Put it into“forever”. And move “=”block into“true”box.

(11) A. Click “Math”→“remainder of 0 ÷1”;
B. Leave it to the left 0 box.
C. Replicate the “PushCounter” once and remain it at the left 0 box of “÷”. Alter 1 into 2.

(12)A. Enter “Advanced” → “Pins” → “digital write pin P0 to 0”, and place it below the block “if remainder…then”;
Red LED is connected to P4, therefore, click the drop-down triangle button to select P4.
Then copy “digital write pin P4 to 0” once and leave it beneath “else”block. Change 0 into 1.

Complete Program:
|
“on start”: |
|---|


Select “JavaScript” and “Python” to switch into JavaScript and Python language code:


(6) Test Results:
Hook components up, upload the code, plug micro:bit to power and press the button. The external LED lights up, press the button again, the LED goes off, alternately.
(7) Extension Project:
Press button, red LED gradually gets brighter.

Project 28:PIR Motion Alarm
(1) Description:
In this lesson, we use the keyestudio PIR motion sensor to detect if someone moves nearby. If it does, the signal terminal of sensor will output a high level 1, otherwise a low level 0 will be output. Pay attention that this sensor can only detect the human body in motion rather in static state. The detection distance is up to 3 meters.
In the project, we connect the keyestudio PIR motion sensor to the keyestudio micro:bit T type shield through the breadboard to control the active buzzer.
(2) Components List:
|
|
|
|
|
|---|---|---|---|---|
Micro:bit Board*1 |
keyestudio Micro:bit T Type Shield*1 |
Active Buzzer*1 |
2.4KΩResistor*1 |
USB Cable*1 |
|
|
|
|
|
S8050Triode*1 |
Breadboard *1 |
Breadboard Wire |
Dupont Wire |
Specialized Power Module*1 |
|
|
|
||
AA Battery*6 |
Keyestudio PIR Motion Sensor*1 |
6 AA Battery Holder*1 |
(3) Schematic Diagram:

(4) Wiring Graph:
(Note: the specialized power module should be connected to breadboard, and the DIP switch is dialed to +3V end)

(5) Test Code:
Code 1:
Wire components up according to the above graph. The S end of PIR motion sensor is connected to P1. Link computer with micro:bit board and program in MakeCode editor.
(1)A. Go to “Basic”→“more”→“clear screen”;
B. Place it into “on start” block
(2) Enter“Basic”to move“show number 0”block into“forever”block.
(3) A.Click “Advanced”→“Pins”→“digital read pin P0;
B. Drag it into 0 box, PIR motion sensor is attached to P1, so set to P1.

(4) Click “Basic” to move “pause (ms) 100” block below “digital write…P2 to 1” block, set to 500ms.

(5)A. Enter“Advanced”→“Serial”→“serial write value “x”=0”;
B. Drag it into“forever”
C. Copy“digital read pin P1”and move it into 0 box
D. Change“X”into“digital signal”.

Complete Program:
|
“on start”: |
|---|

Select “JavaScript” and “Python” to switch into JavaScript and Python language code:


Wire components up, upload code, power on and open CoolTerm, click Options to select SerialPort. Set COM port and baud rate(115200). Click “OK” and “Connect”
When the PIR motion sensor detects people around, serial monitor and micro:bit board will show “1”; otherwise both of them display “0”.

Code 2:
Wire components up according to the above graph. The S end of PIR motion sensor is connected to P1 and active buzzer is linked with P2. Link computer with micro:bit board and program in MakeCode editor.
(1)A. Go to“Basic”→“more”→“clear screen”;
B. Place it into“on start”block
(2)A. Go to“Logic”→“if…true..then…else”.
B. Move it into“forever”
C. Drag out“=”block into“true”box

(3)A. Enter“Advanced”→“Pins”→“digital read pin P0”
B. Place it into left“0”box.
C. PIR motion sensor is connected to P1, so set to P1
D. Alter right 0 into 1.

(4)A. Enter“Advanced”→“Pins”→“digital write pin P0 to 0”
B. Place it below the“digital read pin…1..then”block
C. Active buzzer is connected to P2, so set to P2
D. Alter right 0 into 1.

(5) Click“Basic”to move“show icon”below the block “digital write….P2..1”

(6) A. Duplicate the code string  once and move it below the “else” block.
B. Change 1 into 0. Click the drop-down triangle button to choose“ ”
”

Complete Program:
|
“on start”: |
|---|

 ”
”Select “JavaScript” and “Python” to switch into JavaScript and Python language code:


(6) Test Results:
Wire up, upload the code and plug micro:bit to power. When PIR motion sensor detects people around, active buzzer will emit sound and micro:bit will show pattern; otherwise, buzzer stops emitting sound and
  appears on
micro:bit board.
appears on
micro:bit board.
(7) Extension Project:
When sensor detects people around, make micro:bit cyclically shows the patternand ; otherwise, the pattern
  will be displayed.

Project 29:Seesaw Movement
(1) Description:
There are 2 tilt switches which adopt SW-200D vibration component in this kit.

The SW-200D vibration switch element adopted on this module is the ball type tilt induction unidirectional trigger switch, one end of which is gold-plated(trigger end), another one is silver-plated (conductive end). When the module is in the horizontal position or inclined to the conductive end (silver-plated), the switch element is in OFF state and the signal end outputs the high level; when the module is tilted to the trigger terminal (gold-plated), the switch element is ON state, and the signal terminal outputs the low level.
In the project, we connect tilt switch, breadboard and micro:bit T type shield together. By reading the result on the serial monitor, we observe the two LED brightness.
(2) Components List:
|
|
|
|
|
|---|---|---|---|---|
Micro:bit Board*1 |
Breadboard*1 |
Red LED*2 |
Tilt Switch*2 |
10KΩResistor*2 |
|
|
|
|
|
keyestudio Micro:bit T Type Shield*1 |
Breadboard Wire |
220ΩResistor*2 |
Micro USB Cable*1 |
(3) Schematic Diagram:

(4) Wiring Graph:

(5) Test Code:
Code 1:
Wire components up according to the above connection diagram, the two tilt switches are attached to P6 and P0.
Link computer with micro:bit board and program in MakeCode editor.
(1)Click “Led”→”more”→“led enable false”;Combine it with “on start”.
(2)Click “Advanced” to go to “Serial”, and drag “serial write value “x”=0” into “forever”.

(3)Enter“Advanced”→“Pins”→“digital read pin P0” keep it into 0 box.
The tilt switch is attached to P6, therefore, set to P6. And change“x”into“digital signal”.

(4) Click “Basic”to drag out“pause (ms) 100”, then leave it below“serial write…….P6”block. And set to 300ms.

Complete Program:
|
“on start”: |
|---|

Select “JavaScript” and “Python” to switch into JavaScript and Python language code:


Wire components up, upload code, power on and open CoolTerm, click Options to select SerialPort. Set COM port and baud rate to115200(the baud rate of USB serial communication of micro:bit is 115200 through the test). Click“OK”and “Connect”.
When the tilt switch is inclined to the transmitting end, serial monitor will show“1”; when it tends to conductive end or in horizontal, the serial monitor will display“0”. As shown below:

Code 2:
Wire components up according to the above connection diagram, the two tilt switches are attached to P6 and P0 and 2 LEDs are linked with P2 and P4.
Link computer with micro:bit board and program in MakeCode editor.
(1)A. Click“Led”→”more”→“led enable false”;
B. combine it with “on start”.

(2)A. Click“logic”and move out “=”and“if.true..then”.
B. Lay down“if..true…then” into“forever”.
C. Then drag the“and”block into“true”box.
D. Copy“=”twice and leave them to the left and right boxes of “and”block.
(3)
Go to“Advanced”→“Pins”→“digital read pin P0”
Place it at the first “0”box.
The tilt switch is connected to P6, so set to P6.
Change the second “0” into 1.

(4)
Click “Variables”→“Make a Variable…”→“New variable name:”.
Enter “brightness1” in the blank box and click “OK”. Then the variable“brightness1”is generated.
Move “brightness1” to the third“0”box. Click the button at the second “=”block to set “≠”.
Finally, change 0 into 1023.

(5) Go to “Variables” to get “set brightness1 to 0”, place it beneath the block “if digital read pin P6=1…….1023”

(6)Click “Math” to move “+” block into 0 box.

Enter “Variables” to find out “brightness1”, then lay down it to the left “0” box and change right “0” into 1.

(7)
Enter “Advanced” →“Pins”→“analog write pin P0 to 1023”;
Keep it below the block“set brightness….1”
Red LED is linked with P4, so set to P4
Copy the“brightness1”once and drag it into 1023 box.

(8)
Click“Advanced”to enter“Control”and drag“wait (us) 4”beneath the block “analog….. to brightness 1”
Change 4 into 10.

(9) Duplicate the code string  once and put it into “forever”, and change“digital read pin6 1”into “digital read pin6 0”and 1023 into 0. Then set
  to
to  .
.

(10)
A. let’s create the variable“brightness2”in same way.
B: Replicate the following code string once and place it into “forever” block:

The tilt switch is attached to P0, and the red LED is linked with P2.
Set to“digital read pin P0=1”and “analog write pin P2”, change “brightness1” into “brightness2”.
 *
*
(11) Duplicate code string  once
and keep it into“forever”. Change 0 into 1023
once
and keep it into“forever”. Change 0 into 1023
Set to“digital read pin P0=0” and“set brightness2 to brightness+1”

Complete Program:
|
|---|
|


Select “JavaScript” and “Python” to switch into JavaScript and Python language code:


(6) Test Results:
Wire components up, upload the code and plug micro:bit to power. When two tilt switches are inclined to one side, one LED gets dim gradually, another one get bright instead. And finally, one LED is off, and another one is brightest
(7) Extension Project:
Two tilt switches control 2 LEDs. When they aren’t inclined. A LED lights up, and another one goes off. On the contrary, the LED that lights up will go off, and another one will be on.

Project 30:Night Lamp
(1) Description:
In our daily life, we find that many lamps in the public automatically light up at night, and go off during the day.
Are these lights controlled by someone? In fact, they are are equipped with a photosensitive element, which can detect the brightness of the ambient light.
The photocell sensor (photoresistor) is a resistor made by the photoelectric effect of a semiconductor. It is very sensitive to ambient light, thus its resistance value vary with different light intensity.
We use its features to design a circuit and generate a photoresistor sensor module. The signal end of the module is connected to the analog port of the microcontroller. When the light intensity increases, the resistance decreases, and the voltage of the analog port rises, that is, the analog value of the microcontroller also goes up. Otherwise, when the light intensity decreases, the resistance increases, and the voltage of the analog port declines. That is, the analog value of the microcontroller becomes smaller. Therefore, we can use the photoresistor sensor module to read the corresponding analog value and sense the light intensity in the environment.
It is widely applied to various light-controlled circuits, such as the control and adjustment of lights, as it is generally used for light measurement, light control and photoelectric conversion.
We connect photoresistor, keyestudio micro:bit T Type shield and Breadboard together. The test results will be displayed on serial monitor or dot matrix.
(2) Components List:
|
|
|
|
|
|---|---|---|---|---|
Micro:bit Board*1 |
Photoresistor*1 |
Red LED*1 |
220ΩResistor*1 |
10KΩResistor*1 |
|
|
|
|
|
keyestudio Micro:bit T Type Shield*1 |
Breadboard Wire |
Micro USB Cable*1 |
Breadboard*1 |
(3) Schematic Diagram:

(4) Wiring Graph:

(5) Test Code:
As we know, there are digital and analog ports in Arduino.
For micro:bit board, there are some pins for reading analog vale. As shown below:

We measure the analog value of P2 by photoresistor, then change the ambient light intensity, the analog value is shown on serial monitor(CoolTerm). The LED brightness is controlled by photoresistor.
Code 1:
Hook components up according to the above connection diagram, photoresistor is connected to P2. Link computer with micro:bit board and program in MakeCode editor.
(1)Click“Led”→“more”,and find out“led enable false”, then
put it in the block“on start”
(2)Enter “Advanced”→“Serial”→“serial write value “x”=0”. Move it into“forever”
(3)A. Click“Advanced”→“Pins”→“analog read pin P0”
B. Place it at the “0”box
C. The photoresistor is lined with P2, therefore, set to P2
D. The left “x” is changed into“analog signal”.

(4) A. Go to“Basic”→“pause (ms) 100”
B. Lay down it into“forever”, set to 200ms.

Complete Program:
|
“on start”: |
|---|

Select “JavaScript” and“Python”to switch into JavaScript and Python language code:


Connect components up, upload code, power on and open CoolTerm, click Options to select SerialPort. Set COM port and baud rate is 115200(the baud rate of USB serial communication of micro:bit is 115200 through the test). Click “OK” and “Connect”.
Serial monitor shows the corresponding value. The analog value increase gradually as the ambient light intensity gets weak slowly; otherwise, the analog value reduces bit by bit. As shown below:

Code 2:
Note:you could set the analog value through the test result.
Connect photoresistor to P2, red LED to P4. Link computer with micro:bit board and program in MakeCode editor.
(1)A. Click“Led”→“more”,and find out“led enable false”
B. Put it in the block“on start”
(2) A. Enter“Logic”→“if…true…then…else”.
B. Move it into“forever”and drag “=”into“true”box .
.
(3) A. Go to“Advanced”→“Pins”→“analog read pin P0”,
B. Put it into the left “0”box
C. The photoresistor is attached to P2, then set to P2.
D. Click the drop-down triangle button of “=” to select “>”, alter 0 into 400.

(4) A. Go to“Advanced”→“Pins”→“digital write pin P0 to 0”
B. Leave it beneath“analog …..P2>400 then”block.
C. The red LED is attached to P4, then set to P4 and revise 0 into 1.

(5) Duplicate“digital write pin P4 to 1”once, then keep it beneath “else” block. Change 0 into 1.

Complete Program:
|
“on start”: |
|---|

Select “JavaScript” and “Python” to switch into JavaScript and Python language code:


(6) Test Results:
Connect components up via connection diagram, upload the program and plug micro:bit to power. When the ambient light intensity gets weak, the photoresistor’s input value is greater than or equal to 400, LED will be on; on the contrary, LED will go off.
(7) Extension Project:
Connect one more passive buzzer at P0. When the detected analog value of the light intensity is greater than 400, the LED light is on and the passive buzzer plays “1 (Do), 2 (Re ), 3(Mi), 4(Fa), 5(Sol), 6(La), 7(Si)”; when the analog value is greater than 100 and less than or equal to 400, the LED flashes and passive buzzer doesn’t work instead; when the analog value is greater than or equal to 100, the LED light and the passive buzzer don’t work.


Project 31:Dim Lamp
(1) Description:
When we do the experiment, we often use the adjustable potentiometer which is equivalent to a 10K adjustable resistor. Rotating the potentiometer essentially changes its resistor value. Then the change of resistor value is converted into the change of voltage.
We connect the signal terminal of the adjustable potentiometer to P0 of the micro:bit board. By reading the analog value of the P0 terminal and rotating the potentiometer, the measured analog value is displayed on the CoolTerm serial monitor. Next, we control the brightness of the LED by the potentiometer. When designing the code, we need to set up first. The range of the analog value is 0-1023; the brightness of the LED is in the range of 0-255. In addition, we need to use the mapping function to map the values in the 0-1023 to 0-255.
After setting well, we can control the brightness of the LED by rotating the potentiometer.
(2) Components List:
|
|
|
|
|---|---|---|---|
Micro:bit Board*1 |
keyestudio Micro:bit T Type Shield*1 |
Adjustable Potentiometer*1 |
Red LED*1 |
|
|
|
|
220ΩResistor*1 |
Breadboard*1 |
Breadboard Wire |
Micro USB Cable*1 |
(3) Schematic Diagram:

(4) Wiring Graph:

(5) Test Code:
Code 1:
Link adjustable potentiometer with P0, connect computer to micro:bit board and program in MakeCode editor.
Click“Led”→“more”,and find out“led enable false”
Put it in the block“on start”
(2)
Enter “Advanced”→“Serial”→“serial write value “x”=0”.
Move it into“forever”
(3)
Click“Advanced”→“Pins”→“analog read pin P0”
Place it at the “0”box.
The left“x”is changed into“analog signal”.

(4) Click “Basic” to drag out “pause (ms) 100”, then leave it below “serial write…….P0” block. And set to 300ms.

Complete Program:
|
“on start”: |
|---|

Select “JavaScript” and “Python” to switch into JavaScript and Python language code:


Wire components up, upload code, power on and open CoolTerm, click Options to select SerialPort. Set COM port and baud rate is 115200(the baud rate of USB serial communication of micro:bit is 115200 through the test). Click“OK”and“Connect”.
Serial monitor displays the corresponding value. When adjusting the potentiometer, the value changes from 1 to 1023. As shown below:

Code 2:
Through the above picture, we know that adjustable potentiometer is linked with P0, and red LED is attached to P4.
Link computer with micro:bit board. Then enable the online programming tool to design the code.
(1)Click“Led”→“more”→“led enable false”, Put it in the block“on start”.
(2)Enter “Advanced”→“Pins”→“analog write pin P0 to 1023”; Move it into“forever”block.
Red LED is attached to P4, so set to P4.
(3) Click “Math”→“map 0 from low 0 high 1023 to low 0 high 4”. Drag it into“1023”box

(4) A. Enter“Advanced”→“Pins”→ ”analog read pin P0 ”
B. Leave it at“0”box next to“map”

(5) The the analog input signal is from 0 to 0123. The analog output (PWM) is 0-255, so change 4 into 255, as shown below

Complete Program:
|
|---|
“on start”: command block runs once to start program. |

Select “JavaScript” and “Python” to switch into JavaScript and Python language code:


(6) Test Results:
Wire up, upload the program and plug micro:bit to power. When adjust the potentiometer, the LED light intensity changes as well.
(7) Extension Project:
Replace red LED with RGB, the pins of RGB are connected to P1, P2 and P3.
Potentiometer controls the lights with distinct light intensity.

Project 32:Flame Alarm
(1) Description:
There is inevitable accident in our life, like fire disaster. What should we do to avoid this grave incident?
The flame sensor can tackle this problem.
As it fairly sensitive to flame, flame sensor (IR receiving triode) is generally applied to search for fire sources. It utilizes specific infrared receive tube to detect flame, and then converts the brightness into changed level signal.
Therefore, when detecting the fire nearby, it will alarm to remind people to put out the fire in time. Moreover, it can control the fire extinguisher to quell the fire automatically as well when connected to fire annihilator.
Note: Flame sensor (IR receiver Triode) can detect flames or light sources with a wavelength in the range of 760nm to 1100 nm, and its detection angle is about 60 degrees.
(2) Components List:
|
|
|
|---|---|---|
Micro:bit Board*1 |
Keyestudio Micro:bit T Type Shield*1 |
Active Buzzer*1 |
|
|
|
Flame sensor(IR receiving triode)*1 |
S8050 Triode*1 |
Red LED*1 |
|
|
|
Breadboard*1 |
Breadboard wire |
Breadboard Specialized Power Module*1 |
|
|
|
6 AA Battery Holder*1 |
Micro USB Cable*1 |
AA Battery*6 |
|
|
|
2.4KΩ Resistor*1 |
220Ω Resistor*1 |
10KΩ Resistor*1 |
|
|
|
Fan *1 |
L293D Driver Chip*1 |
DC Motor*1 |
(3) Schematic Diagram:
(Special note: both ends of breadboard specialized power module must be inserted into breadboard, and dial the DIP switch to +3V on power module )

(4) Wiring Graph:
(Special note: both ends of breadboard specialized power module must be inserted into breadboard, and dial the DIP switch to +3V on power module )


(5) Test Code:
Code 1:
Wire up according to the above diagram, flame sensor is connected to P4. Link computer with micro:bit board and program in MakeCode editor
(1) Click “Led”→”more”to get block“led enable false”, combine it with “on start”.
(2)Enter“Advanced”→“Serial”→“serial write value“x”=0”. Move it into“forever”block
(3)

Click“Advanced”→“Pins”→“analog read pin P0”; Place it at the right“0”box
The flame sensor is lined with P4, thereby, set to P4
The left “x” is changed into“analog signal”.
(4)
Go to “Basic”→“pause (ms) 100”; Lay down it into“forever”and set to 300ms. As shown below

Complete Program:
|
“on start”: |
|---|

Select “JavaScript” and“Python”to switch into JavaScript and Python language code:


Wire components up, upload code, power on and open CoolTerm, click Options to select SerialPort. Set COM port and baud rate to 115200 (the baud rate of USB serial communication of micro:bit is 115200 through the test). Click“OK”and “Connect”
When the flame sensor detects the flame, serial monitor and micro:bit board will show“1”; otherwise both of them display “0”

Code 2:
Wire components up according to the above connection diagram, active buzzer is linked with P6, red LED is connected to P5 and flame sensor is linked with P4. Link computer with micro:bit board and program in MakeCode editor
(1)Click “Led”→“more”to get block“led enable false”, combine it with “on start”.
(2)A. Go to“Logic”→“if…true..then…else”.
B. Move it into“forever”
C. Drag out“=”block into“true”box
(3) A. Enter“Advanced”→“Pins”→“digital read pin P0”
B. Place it into left o box
C. Flame sensor is connected to P4, so set to P4
D. Alter 0 into 1.

(4)
Enter“Advanced”→“Pins”→“digital write pin P0 to 0”
Leave it under the block “if..digital..P4…1”
Active buzzer is attached to P6, thereby, set to P6
Alter 0 into 1

(5)
Duplicate block“digital write pin P6 to 1”once,
Place it beneath the block “digital…P6..to 1”
Red LED is attached to P5, therefore, set to P5

(6)Go to“Basic”module to get block“pause (ms) 100”, and keep it under block“digital read pin P5..to 1”

(7)A. Replicate the code string once and place it under the block “pause(ms)100”
B. Set digital write pin P5 to 0

(8)
Go to“Advanced”→“Pins”→“analog write pin P0 to 1023”
Then drag out“digital write pin P0 to 0”and copy twice.
L293D driver chip is connected to P0, P1 and P2. Then set pins as follows. Then change 1023 into 1000.

(9)
Duplicate
 once and leave it beneath“else”clock.
Delete delay blocks and block“digital write pin P5 to 1”, then set the code string as follows

Complete Program:

Select “JavaScript” and “Python” to switch into JavaScript and Python language code:


(6) Test Results:
Wire components up, download test code to micro:bit and plug it to power. When the flame is detected, micro:bit board displays  , passive buzzer rings and red LED flashes simultaneously; otherwise,
  appears, passive buzzer and red LED don’t response.
Project 33:DIY Voice-controlled Light
(1) Description:
The sound sensor mainly adopts a high-sensitivity microphone element and LM386 chip. High-sensitivity microphone components are used to detect external sounds. The LM386 chip can amplify the sound detected by the high-sensitivity microphone, and the maximum multiple is 200 times.
When in use, we can adjust the multiple of the sound by rotating the potentiometer on the sensor. When adjusting the potentiometer clockwise to the end, the magnification is maximized.
Therefore, it can be used to make voice-activated robots, switches and alarms, etc.
In this project, we connect the signal of the sound sensor to P0 of the micro:bit board, and detect the magnitude of the external sound by reading the analog value of the P0 terminal. During the detection, the louder the external sound, the greater the analog value; the smaller the external sound, the smaller the analog value.
Simultaneously, we will display the measured analog value on the serial monitor and control LED brightness.
(2) Components List:
|
|
|
|
|
|---|---|---|---|---|
Micro:bit Board*1 |
Keyestudio Micro:bit T Type Shield*1 |
Keyestudio Sound Sensor*1 |
Red LED*1 |
220ΩResistor*1 |
|
|
|
|
|
Breadboard*1 |
Breadboard Wire |
Micro USB Cable*1 |
Dupont Wire |
(3) Schematic Diagram:

(4) Wiring Graph:

(5) Test Code:
Code 1:
Wire components up according to the above connection diagram, the S end of sound sensor is attached to P0. Link computer with micro:bit board and program in MakeCode editor.
(1)Click“Led”→“more”,and find out“led enable false”. Put it in the block“on start”
(2)A. Enter “Advanced”→“Serial”→“serial write value “x”=0”.
B. Move it into“forever”.
(3)A. Enter“Advanced”→“Pins”→“analog read pin P0”.
B. Place it at the “0”box
C. Change“x”into“Sound analog value”

(3) A. Go to“Basic”→“pause (ms) 100”
B. Lay down it into“forever”block:

|
“on start”: |
|---|

Click “JavaScript”, you will view the corresponding JavaScript code:

Then click drop-down triangle button and select“Python”to see the Python language code:

Wire up, upload the program, power on and open CoolTerm, click Options to select SerialPort. Set COM port and baud rate is 115200(the baud rate of USB serial communication of micro:bit is 115200 through the test). Click“OK”and“Connect”.
Change the ambient sound intensity and the displayed result will be on the serial monitor, as shown below:

Code 2:
Note:you could set the analog value through the test result.
Connect sound sensor to P0, red LED to P2. Link computer with micro:bit board program in MakeCode editor.
(1)A. Click“Led”→“more”,and find out“led enable false”
B. Put it in the block“on start”
(2)Enter“Logic”→“if…true…then…else”. Move it into“forever”and drag “=”into“true”box
(3)Go to“Advanced”→“Pins”→“analog read pin P0”,Put it into the left“0”box; Click the drop-down triangle button of “=” to select “>”, alter 0 into 100

(4)
Go to“Advanced”→“Pins”→“digital write pin P0 to 0”,
Leave it beneath“analog…. P0>100 then” block.
The red LED is attached to P2, then set to P2 and revise 0 into 1.

(5)
Go to “Basic”→“pause (ms) 100”
Lay down it beneath “digital write P2 to 1”, set to 1000ms.

(6) Replicate“digital write pin P2 to 1” once and leave it beneath “else”block, change 1 into 0.

Complete Program:
|
“on start”: |
|---|

Select “JavaScript” and “Python” to switch into JavaScript and Python language code:


(6) Test Results:
Wire components up, upload the program and plug micro:bit to power. When the analog value of sound intensity is greater than 100. LED will be on 1s; otherwise, LED will go off.
(7) Extension Project:
When the analog value of sound intensity is greater than 150,LED will light up for 5s and micro:bit board shows ;Otherwise,LED will go off and pattern
  will appear on micro:bit board.

Project 34:Water Level Monitoring Alarm
(1) Description:
A surge in water level of river or dam will bring out the grave results when the pouring rain and rain storm comes. Nowadays, we could address this challenge by a special sensor–water level sensor to prevent the potential accident.
The water level sensor is analog input module. It is a simple, easy-to-use, compact, lightweight, and cost-effective.
Its principle is to detect the amount of water to determine the water level by bare printed parallel lines on the circuit board.
The conversion of water volume to analog signal and the output analog value can be directly applied by the function in the program.
In this project, we attach the water level sensor to P0 of micro:bit board.
The water level can be detected by reading the analog value of P0. The higher the water level, the larger the analog value.
(2) Components List:
|
|
|
|
|---|---|---|---|
Micro:bit motherboard*1 |
keyestudio Micro:bit T Type Shield*1 |
Red LED*1 |
Yellow LED*1 |
|
|
|
|
220Ω Resistor*3 |
Breadboard*1 |
F-M Dupont Lines |
Breadboard Wire |
|
|
|
|
Green LED*1 |
keyestudio Water Level Sensor*1 |
Micro USB Cable*1 |
(3) Schematic Diagram:

(4) Wiring Graph:

(5) Test Code:
Code 1:
Wire up according to Wiring Graph, water level sensor is linked with P0, Link computer with micro:bit board and program in MakeCode editor.
(1) Click“Led”→“more”,and find out“led enable false”
(2) Put it into the block“on start”
(3)Enter “Advanced”→“Serial”→“serial write value “x”=0”. Move it into“forever”block
(4)
Click“Advanced”→“Pins”→“analog read pin P0”
Place it at the right“0”box
The left “x” is changed into“analog signal”.
(5)Go to “Basic”→“pause (ms) 100”. Lay down it into“forever”and set to 200ms. As shown below

Complete Program:
|
|
|---|


Select “JavaScript” and “Python” to switch into JavaScript and Python language code:


When water level sensor isn’t placed into water, the output value is 0. With the sensor submerging gradually into the water, analog value is getting larger; when emerging into the water completely, the output value is about 710. However, the analog value is getting smaller when taking it out of water.
When the sensor is kept from water, the output value is not 0 (the water on the sensor may affect). The value is 0, when the water is wiped off.
Wire components up, upload code, power on and open CoolTerm, click Options to select SerialPort. Set COM port and baud rate is 115200 (the baud rate of USB serial communication of micro:bit is 115200 through the test). Click“OK”and“Connect”.

Code 2:
Note: you could set the analog value through the test result.
Connect water level sensor to P0, yellow LED to P4, green LED to P6 and red LED to P9. Link computer with micro:bit board and program in MakeCode editor.
(1)Click“Led”→“more”,and find out“led enable false”; Combine it with “on start” block.
(2)
Click“Logic”→“if…true….then…else”
Put it down into“forever”and drag out“=”into “true”block

(3) Click “Advanced” → “Pins” to find out “analog read pin P0” block, and keep it at the left 0 box. Water level sensor is linked with P0, keep P0 unchanged. Then set to “analog read pin P0 < 100”

(3) A. Enter “Advanced” → “Pins” → “digital write pin P0 to 0”
B. Leave it beneath “if…P0..100” block and copy for 2 times.
C. Yellow, green and red LEDs are respectively linked with P4, P6 and P9. So set to P4, P6, P9

(4) Replicate code string  once and place it into “forever”,
Remove the “analog read pin P0<100” first.
Go to “Logic” to drag out “and” block and keep it into “true” box. Place “analog read pin P0<100” to the left blank box and change “<” into “≥”; Copy “analog read pin P0<100” once and set to“analog read pin P0<200” then move it into right blank box.
Change 0 into 1 for P4.

(5) Duplicate code string once and place it into “forever”, alter 100 into 200, 200 into 300. Change 1 into 0 for P4 and 0 into 1 for P6.

(6) Copy the code string again and leave it into “forever”. Change “<” into “≥”, 100 into 400 and 0 into 1 for P9.

Complete Program:
|
|---|
|


Select “JavaScript” and “Python” to switch into JavaScript and Python language code:


(6) Test Results:
Wire up through the connection diagram, upload the code and plug micro:bit to power. Insert the water level sensor into water, when the analog value is less than 100, all LEDs are off; when the value is greater than or equal to 100 and less than 200, yellow LED lights up; when the value is greater than or equal to 200 and less than 400, green light will be on. When it is greater than or equal to 400, red LED will light on.
Project 35:Humidity Detection Device
(1) Description:
This is a simple soil humidity sensor aims to detect the soil humidity.
If the soil is in lack of water, the analog value output by the sensor will decrease; otherwise, it will increase. If you use this sensor to make an automatic watering device, it can detect whether your botany is thirsty to prevent it from withering when you go out. Using the sensor with Arduino controller makes your plant more comfortable and your garden smarter. The soil humidity sensor module is not as complicated as you might think, and if you need to detect the soil in your project, it will be your best choice.
The sensor is set with two probes, when inserted into the soil, the sensor will get resistance value by reading the current changes between the two probes and convert such resistance value into moisture content. The higher moisture (less resistance), the higher conductivity the soil has.
Its service life extends by metallizing the surface.
Insert it into the soil and then use the AD converter to read it. With the help of this sensor, the plant can remind of you: I need water. It comes with 2 positioning holes for installing on other devices.
In this experiment, we connect soil humidity sensor to P10 of micro:bit board and read the analog value of P10 then detect humidity. The larger the humidity, the larger the value. You could view the analog value on serial monitor.
(2) Components List:
|
|
|
|
|---|---|---|---|
Micro:bit Board*1 |
Keyestudio Micro:bit T Type Shield*1 |
Keyestudio Soil Humidity Sensor*1 |
Breadboard*1 |
|
|
|
|
keyestudio1602 LCD Display Module*1 |
Keyestudio Breadboard Specialized Power Module*1 |
AA Battery *6 |
6 AA Battery Holder*1 |
|
|
|
|
Micro USB Cable*1 |
F-M Dupont Lines |
Breadboard Wire |
(3) Schematic Diagram:
(Note: the specialized power module should be connected to breadboard, and the DIP switch is dialed to +3V end)

(4) Wiring Graph:
(Note: the specialized power module should be connected to breadboard, and the DIP switch is dialed to +3V end)

(5) Test Code:
Code 1:
Wire components up according to the above connection diagram, S end of Soil Humidity sensor is attached to P10. Link computer with micro:bit board and program in MakeCode editor.
(1)Click“Led”→“more”→“led enable false”. Put it into the block “on start”
(2)A. Click“Advanced”to go to“Serial”, and drag“serial write value “x”=0”into “forever”.
B. Go to“Advanced”→“Serial”→“serial write value “x”=0”,
C. Leave it into“forever”.
(3)
Click“Advanced”→“Pins”→“analog read pin P0”
Leave it into“0”box.
The soil humidity sensor is connected to P10, so click the drop-down button to select P10. Modify the“x” into “analog signal”.

(4) Click“Basic”to drag out “pause (ms) 100”and put it into“forever”block, then set to 200ms.

Complete Program:
|
“on start”: |
|---|

Select “JavaScript” and “Python” to switch into JavaScript and Python language code:


Hook components up through the Wiring Graph, upload code, power on and open CoolTerm, click Options to select SerialPort. Set COM port and baud rate is 115200(the baud rate of USB serial communication of micro:bit is 115200 through the test). Click “OK” and “Connect”.
Insert soil humidity sensor into soil. As the humidity grows gradually, the analog signal of soil humidity sensor will increase as well.

Code 2:
Wire up through the connection diagram, upload the code and plug in power. The humidity and temperature sensor is connected to P10; the 1602LCD module is linked with P20 and P19. Link computer with micro:bit board and program in MakeCode editor.
(1)Click “Led”→”more”to get block“led enable false”, combine it with “on start”.
(2)A. Go to“LCD1602”module→ “LCD1602 I2C address 0x27”and“LCD clear”
B. Leave them below the block “led enable false” block

(3)A. Enter “LCD1602” → “LCD clear” and “LCD show string “ ”on x: 0 y: 0”
B. Leave them into “forever” block. Put in“soil moisture:”in the box; Set x to 1

(4)Go to “LCD1602” to move out “LCD show number 0 on x: 0 y: 0”. Click “Advanced” → “Pins” → “analog read pin P0”
Leave this block into 0 box behind“number”, soil sensor is linked with P10
Set analog read pin P10 and x:1, y:1

(5)Click “Basic” to get “pause (ms) 100” block. Place it into “forever” block and set to 200ms

Complete Program
|
“on start”: |
|---|

Select “JavaScript” and “Python” to switch into JavaScript and Python language code:


(6) Test Results:
Hook components up according to connection diagram, upload the program and plug micro:bit to power. Rotate the potentiometer at the back of the 1602LCD module to adjust the brightness, and insert the soil sensor into the soil. Then we will see that soil moisture value on the 1602 LCD module. The soil moisture increases by the soil humidity.
Project 36:Relay Module
(1) Description:
This module is an Arduino dedicated module, and compatible with arduino sensor expansion board. It has a control system (also called an input loop) and a controlled system (also called an output loop).
Commonly used in automatic control circuits, the relay module is an “automatic switch” that controls a larger current and a lower voltage with a smaller current and a lower voltage.
Therefore, it plays the role of automatic adjustment, safety protection and conversion circuit in the circuit. It allows Arduino to drive loads below 3A, such as LED light strips, DC motors, miniature water pumps, solenoid valve pluggable interface.
The main internal components of the relay module are electromagnet A, armature B, spring C, moving contact D, static contact (normally open contact) E, and static contact (normally closed contact) F, (as shown in the figure ).

As long as a certain voltage is applied to both ends of the coil, a certain current will flow through the coil to generate electromagnetic effects, and the armature will attract the iron core against the pulling force of the return spring under the action of electromagnetic force attraction, thereby driving the moving contact and the static contact (normally open contact) to attract. When the coil is disconnected, the electromagnetic suction will also disappear, and the armature will return to the original position under the reaction force of the spring, releasing the moving contact and the original static contact (normally closed contact). This pulls in and releases, thus achieving the purpose of turning on and off in the circuit. The “normally open and closed” contacts of the relay can be distinguished in this way: the static contacts on disconnected state when the relay coil is powered off are called “normally open contacts”; the static contacts on connected state are called “normally closed contact”. The module comes with 2 positioning holes for you to fix the module to other equipment.
(2) Components List:
|
|
|
|
|---|---|---|---|
Micro:bit Board*1 |
Keyestudio Micro:bit T Type Shield*1 |
Red LED*1 |
Micro USB Cable*1 |
|
|
|
|
keyestudio 1-channel Relay Module*1 |
Breadboard*1 |
220ΩResistor*1 |
F-M DuPont Lines |
|
|
|
|
6 AA Battery Holder*1 |
Keyestudio Breadboard Specialized Power Module*1 |
Breadboard Wire |
AA Battery*6 |
(3) Schematic Diagram:

(4) Wiring Graph:

(5) Test Code:
Wire up through the connection diagram, connect relay to P0. Link computer with micro:bit board. Then enable the online programming tool to design the code.
(1)Click “Led”→ “more”→ “led enable false”, Combine it with“on start”.
(2)Click“Advanced”→“Pins”→“digital write pin P0 to 0”; Place it into“forever”block, change 0 into 1.

(3)Enter “Basic” and move out “pause (ms) 100” below the block “digital write…….to 1”, and set to 500ms.

(4)Copy code string  once and put it below “pause (ms) 500”, change 1 into 0.

Complete Program:
|
“on start”: |
|---|

Select “JavaScript” and “Python” to switch into JavaScript and Python language code:


(6) Test Results:
Wire up through the connection diagram, upload the code and plug micro:bit to power. The relay will be on (NO on, NC off) for 0.5s and off (NO off , NC on) for 0.5s, alternately. When relay is connected, red LED lights up, if it is disconnected, LED goes off.
Project 37:Detect Ambient Temperature
(1) Description:
For example, when temperature is 0 ℃, it outputs 0V; if increasing 1 ℃, the output voltage will increase 10 mv. Input its output voltage into P2 on micro:bit main board, after formula computing, display the temperature value of current surroundings on the serial monitor. In this way, we will use a serial communication software, Arduino IDE. Notice the wiring direction of LM35, or else it will damage the LM35 sensor if reverse.
LM35DZ sensor element is a temperature sensor whose output voltage is proportional to Celsius temperature. The output can start from 0℃, and its sensitivity is 10mV/℃; the output temperature is 0℃~100℃, the conversion formula is as follows:when temperature is 0 ℃, it outputs 0V; if increasing 1 ℃, the output voltage will increase 10 mv.
Its working voltage is 4-30V; the accuracy is ±1℃. The maximum linearity error is ±0.5℃; the quiescent current is 80uA.

We detect the ambient temperature and control the dot matrix to display distinct patterns by it.
(2) Components List:
|
|
|
|
|---|---|---|---|
Micro:bit Main Board*1 |
Keyestudio Micro:bit T Type Shield*1 |
LM35DZ*1 |
RGB*1 |
|
|
|
|
220Ω Resistor *3 |
Breadboard*1 |
Breadboard Wire |
Micro USB Cable*1 |
(3) Schematic Diagram:

(4) Wiring Graph:

(5) Test Code:
Code 1:
Hook components up according to the above connection diagram, LM35DZ is attached to P0. Link computer with micro:bit board and program in MakeCode editor.
Click“Led”→ “more”to get block“led enable false”, and combine it with“on start”
(1)
Click“Led”→“more”,and find out“led enable false”
Put it into the block“on start”
(2) 
Click“Variables”→“Make a Variable…”→“New variable name:”
Enter“Temp”in the dialog box, click “OK”, then the variable“Temp”is created.
Drag out“set Temp to 0”into“forever”
(3)
Enter“Math”→“square root 0”
Leave it into 0 box.
Click the triangle button to select“integer÷”and we get
 block.
Go to“Math”to drag“*”block into the left 0 box

(4)
Go to “Advanced”→“Pins”→“analog read pin P0”
Drag it into the second“0”box
Change the first 0 into 300 and the third 0 into 1023.

(5)
Enter“Advanced”→“Serial”→“serial write line“ ””and“serial write number“ ””
Leave them into“forever”and enter“Temp”in the“serial write line“ ””block.
Go to“Variables”to move out variable“Temp”into “serial write number”””
Duplicate“serial write line“ ””and input “C”character.

(6)Click “Basic” to move out “pause (ms) 100” below “serial write line“C” block, and set to 200ms

Complete Program:
|
“on start”: |
|---|

Select “JavaScript” and “Python” to switch into JavaScript and Python language code:


Wire up through the connection diagram, upload the code and power on. Open CoolTerm, click“serialPort”, set to COM port and baud rate is 115200(the baud rate of USB serial communication of micro:bit is 115200 through the test). Click“OK” and “Connect”.
Serial monitor shows the ambient temperature, as shown below:

Code 2:
(Note: you could set the analog value through the test result.)
Hook up components through the Wiring Graph, connect LM35DZ sensor to P0. Link computer with micro:bit board and program in MakeCode editor.
(1)Click “Led” → “more”, and find out“clear screen”. Put it into the block “on start”
(2)
Go to “Logic” → “if. true..then…else”
Place it into “forever” block
Drag “=” into “true” block.

(3)
Go to “Math” → “square root 0”
Place it into left “0” box
Click the drop-down triangle button to select “integer÷”. Then get block
 .
.Go to “Math” to move out “*” block to left “0” box.

(4)
Click“Advanced”→“Pins”→“analog read pin P0”
Leave it into the second 0 box, change the first 0 into 300, the third 0 into 1023.
Click the drop-down triangle button to select“≤”, change the fourth 0 into 30.

(5) A. Go to “Advanced” → “Pins” → “analog write pin P0 to 1023”
B. Copy this block once and Leave it beneath “if…≤1023…30” block
C. Set P1 to 1023, P2 to 0

(6)
Go to “Basic” → “show icon❤”
Leave it below the “analog …P2…0” block
Drag out “pause(ms)100” under the “show icon❤” block and set to 200ms

(7)A. Duplicate code string  once and leave it below“pause(ms) 200”block.
B. Set P1 to 0, P2 to 1023
C. Click“❤”to select“ ”
”

(8)A. Replicate code string once
B. Set P1 to 1023
C. Set to “ ”pattern

(9)A. Duplicate code string again and leave it below else block, set P1 and P2 to 512.
B. Set“ ”pattern

(10)Duplicate  twice and leave them below“else” block. Respectively click the triangle button to select
“
twice and leave them below“else” block. Respectively click the triangle button to select
“ ”and “
 ”patterns.

Complete Program:
|
|---|
“on start”: command block runs once to start program. |


 ”
”  ”
” ”pattern
 ”pattern
 ”pattern
Select “JavaScript” and “Python” to switch into JavaScript and Python language code:


(6) Test Results: Hook up components according to the wiring diagram, upload the program, and plug micro:bit to power. When the outside temperature is less than or equal to 30°C, the 5*5 dot matrix displays the pattern and RGB lights up the corresponding color. When the temperature is greater than 30°C, RGB lights up one color and multiple patterns are displayed on micro:bit board.
Project 38:Ultrasonic Ranging
(1) Description:
Ultrasonic sensors emit short, high-frequency sound pulses at regular intervals. These propagate in the air at the velocity of sound. If they strike an object, then they are reflected back as echo signals to the sensor, which itself computes the distance to the target based on the time-span between emitting the signal and receiving the echo.
In this lesson, we will firstly link the HC-SR04 ultrasonic sensor with the keyestudio mini T-shaped shield, which is used to test the distance between the ultrasonic sensor and the obstacle in front and display it on the CoolTerm serial port. Then connect the OLED display module so as to show the obstacle distance.
(2) Components List:
|
|
|
|
|---|---|---|---|
Micro:bit Board*1 |
keyestudio Micro:bit T Type Shield*1 |
HC-SR04 Ultrasonic Sensor*1 |
F-M DuPont Lines |
|
|
|
|
Keyestudio OLED Display module*1 |
Breadboard*1 |
6 AA Battery Holder*1 |
Breadboard Wire |
|
|
|
|
Keyestudio Breadboard Power Module*1 |
AA Battery*6 |
Keyestudio 1602 LCD Module |

(3) Schematic Diagram:
(Note: the ends of specialized power module should be connected to breadboard, and the DIP switch on power module should be dialed to +5V end)

(4) Wiring Graph:
(Note: the ends of specialized power module should be connected to breadboard, and the DIP switch on power module should be dialed to +5V end)

(5) Test Code:
Code 1:
Wire according to connection diagram. Connect HC-SR04 ultrasonic sensor to P2 and P1. Link computer with micro:bit board. Then enable the online programming tool to design the code.
(1)Click “Led” → “more” → “led enable false”. Put it in the block “on start” block.

(2) Enter“Advanced”→“Pins”→“digital write pin P0 to 0”. Leave it into“forever”block. HC-SR04 ultrasonic sensor is linked with P2, so click the triangle button to choose P2.

(3)
Click“Advanced”→Control”→“wait (us) 4”;
Put it below“digital..P2..0”block and change 4 into 2.

(4) Copy code string once and drag it into “forever” block,set the code string as follows:

(5) Duplicate“digital write pin P2 to 0”once and leave it below “wait (us) 10” block:

(6)
Enter ”Variables” → “Make a Variable…” → “New variable name:”;
Enter “distance” in the dialog box and click “OK”, then the variable “distance” is generated;
Move block“set distance to 0”from“Variables”and keep it below “digital…P2..0”block, as shown below.

(7)
Go to “Math” → “square root 0”;
Place it into “0” box of “set distance to 0” block;
Click the triangle button to select “integer÷”.

(8)
A. Enter “Advanced” → “Pins” → “more” → “pulse in (us) pin P0 pulsed high”;
B. Place it into the left “0” of “integer÷” block. HC-SR04 ultrasonic sensor is attached to P1,so click the drop-down triangle; button to set P1,And change the right “0” of “integer÷” into 58.

(9)
Enter “Advanced” → “Serial” → “serial write value“x”=0”;
Put it into “forever” block;
Tap “Variables” → “distance” and keep it at the right box of “=”, and change “x” into “distance(cm)”.

(10) Click“Basic”to drag out“pause (ms) 100”, then leave it into “forever”block. And set to 50ms.

Complete Code
|
|
|---|---|
“on start”: command block runs once to start program. |

Select “JavaScript” and “Python” to switch into JavaScript and Python language code:


Code 2:
Wire up through the connection diagram, HC-SR04 ultrasonic sensor is linked with P2 and P1. Link computer with micro:bit board and program in MakeCode editor.
How to add the library file of ultrasonic sensor:
Enter the micro:bit online programming page then click ”Variables” and “Extensions”.
Input sonar to search, as shown below, click the library file to download and install automatically.

After installing the library file of ultrasonic sensor successfully and view the corresponding the module in the editing area.

(1)A. Click “Led”→“more”→“led enable false”;
B. Combine it with “on start”.
(2)
Click “Variables” → “Make a Variable…” → “New variable name:”.
Input “distance” in the dialog box to click “OK”, then the variable “distance” is created.
Go to “Variables” to move “set distance to 0” into “forever” block.

(3)
Click “Sonar” to find out“ping trig P0 echo P0 unit us”. Put it into “0” box.
HC-SR04 ultrasonic sensor is linked with P2 and P1, therefore set to trig P2 echo P1 then click triangle button to select “cm”.

(4)
Enter “Basic” → “pause (ms) 100”;
Put it into “forever” and set to 50ms.

(5)
Go to “Advanced” → “Serial” → “serial write value “x”=0”.
Keep it into “forever”.
Click “Variables” to drag “distance” into “0” box .
Change “x” into “distance(cm)”.

Complete Program:
|
“on start”: |
|---|

Click “JavaScript”, you will view the corresponding JavaScript code:

Then click drop-down triangle button to select“Python”to see the Python language code:

Wire up through the connection diagram, upload code, power on and open CoolTerm, click Options to select SerialPort. Set COM port and baud rate is 115200(the baud rate of USB serial communication of micro:bit is 115200 through the test). Click “OK” and “Connect”. The result is shown on serial monitor.

Code 3:
Wire up through the connection diagram, HC-SR04 ultrasonic sensor is linked with P2 and P1. 1602LCD display module is connected to P20 and P19.
Link computer with micro:bit board and program in MakeCode editor.
(1) Click “Led” → “more”, and find out “led enable false”. Put it into the block“on start.
(2)
A. Go to“LCD1602”to get block“LCD1602 I2C address 0x27”;
B. Leave it beneath block“led enable false”;
C. Drag out“LCD clear”into“on start”(as shown below).
(3) Click “LCD1602” to move out “LCD clear” into “forever”.

(4)
A. Click “Variables” → “Make a Variable…” → “New variable name:”; B. Enter“distance”in the dialog box and click “OK”, then variable“distance”is created; C. Go to“Variables”to drag“set distance to 0”block beneath “forever” block.

(5) Enter “Sonar” to find out “ping trig P0 echo P0 unit us” block. HC-SR04 ultrasonic sensor is connected to P2 and P1. Set to “cm” as shown below.

(6) A. Go to “LCD1602” → “LCD show number 0 on x: 0 y: 0”.
B. Leave it into forever block;
C. Enter “Variables” to move out variable “distance” into first 0 box.

(7) Enter “LCD1602” block to move out “LCD show string“ ”on x: 0 y: 0”.
Leave it beneath “LCD show number distance on x:0 y:0” block;
Set x:4 and “cm” as follows.

(8) Drag block “pause (ms) 100” from “Basic” into “forever”. Then set to 200ms.

Complete Program
|
“on start”: |
|---|

Select “JavaScript” and “Python” to switch into JavaScript and Python language code:


(6) Test Results:
Wire up according to the connection diagram, upload the program, and plug in power. After rotating the potentiometer at the back of the 1602 LCD module to adjust the brightness, then we can see that detected obstacle distance on the 1602 LCD module.
7. Resources
Keyestudio official website: http://www.keyestudio.com/
Download program code, CoolTerm and driver : https://fs.keyestudio.com/KS4003-4004
CoolTerm program: https://freeware.the-meiers.org/
Micro:bit online programming: https://makecode.Micro:bit.org/